Build OpenShift
View on GitHubDeploy OpenShift Offline
Install
Section titled “Install”Pull Required Binaries
Section titled “Pull Required Binaries”- Pull the installer and binaries from here. You will need to pull both the client, installer, and oc-mirror separately.
- Extract them, run
chmod +x oc kubectl openshift-install oc-mirrorand thensudo mv oc kubectl openshift-install oc-mirror /usr/local/bin
- Extract them, run
- Get your pull secret from here and save it somewhere
Specifying a Version
Section titled “Specifying a Version”If you need to install a specific version, make sure you grab the binaries specifically associated with that version.
- You can get a specific version by going to this URL: https://mirror.openshift.com/pub/openshift-v4/x86_64/clients/ocp/
DNS Entries
Section titled “DNS Entries”- I used dnsmasq for my DNS server with the following config. I had multiple clusters set up. The main one I use in this tutorial is vmware-cluster. Notice that the apps IP is going to be the same as your API IP.
# Configuration file for dnsmasq.
# Never forward plain names (without a dot or domain part)domain-needed
# Never forward addresses in the non-routed address spaces.bogus-priv
# Specify the local domains for dnsmasq to resolvelocal=/lan/local=/openshift.lan/local=/test.openshift.lan/local=/vmware-cluster.openshift.lan/
# Add local DNS records from this fileaddn-hosts=/etc/dnsmasq.hosts
# Add wildcard DNS entry for *.apps domainsaddress=/apps.test.openshift.lan/10.10.25.189address=/apps.vmware-cluster.openshift.lan/10.10.25.178
# Specify interfaces to listen oninterface=lointerface=ens192
# Bind only to the interfaces it is listening onbind-interfaces
# Set the primary domain for dnsmasqdomain=openshift.landomain=test.openshift.landomain=vmware-cluster.openshift.landomain=lan
# Include all the files in a directory except those ending in .bakconf-dir=/etc/dnsmasq.d,.rpmnew,.rpmsave,.rpmorig- I had the following additional entries setup for everything else in my
/etc/hostsfile. Notice that the one labeled quay is going to be our mirror server - that should be a separate machine outside of your OpenShift cluster, but that all the cluster machines can reach.
# Quay10.10.25.131 grant-staging.openshift.lan
# OpenShift VMWare Cluster10.10.25.179 api.vmware-cluster.openshift.lan10.10.25.178 oauth-openshift.apps.vmware-cluster.openshift.lan10.10.25.178 console-openshift-console.apps.vmware-cluster.openshift.lan10.10.25.178 grafana-openshift-monitoring.apps.vmware-cluster.openshift.lan10.10.25.178 thanos-querier-openshift-monitoring.apps.vmware-cluster.openshift.lan10.10.25.178 prometheus-k8s-openshift-monitoring.apps.vmware-cluster.openshift.lan10.10.25.178 alertmanager-main-openshift-monitoring.apps.vmware-cluster.openshift.lan
# Bootstrap host (THIS IS ONLY FOR THE USER PROVISIONED INFRASTRUCTURE INSTALL)# For the UPI install you have to have a separate bootstrap host just for the install. If you aren't doing UPI,# you can safely ignore this. You also don't need a bootstrap host after OpenShift 4.13=<10.10.25.169 bootstrap.openshift.lan
Set Up Your Local Mirror
Section titled “Set Up Your Local Mirror”- Do the following on the host you plan to use as your mirror. You’ll need a machine with a few hundred gigs of space. I went with 300GB.
- Replace the below script with your values and then run it.
sudo firewall-cmd --add-service=dns --permanent && sudo firewall-cmd --add-port=8443/tcp --permanent && sudo firewall-cmd --add-service=dhcp --permanent && sudo firewall-cmd --reload && sudo firewall-cmd --list-allwget https://developers.redhat.com/content-gateway/rest/mirror/pub/openshift-v4/clients/mirror-registry/latest/mirror-registry.tar.gzmkdir -p mirror-registry && tar -xzvf mirror-registry.tar.gz -C ./mirror-registrycd mirror-registry
# Export the necessary variablesexport quayHostname="mfdt-staging.openshift.lan" # Update meexport quayRoot="/home/grant/mirror/ocp4" # Update meexport quayStorage="/home/grant/mirror/ocp4" # Update meexport pgStorage="/home/grant/mirror/ocp4" # Update meexport initPassword="I.am.ghost.47" # Update me
# Install the reposudo ./mirror-registry install --quayHostname $quayHostname --quayRoot $quayRoot --quayStorage $quayStorage --pgStorage $pgStorage --initPassword $initPassword
# Copy the newly created root CA to the trusted certificate directorysudo cp $quayRoot/quay-rootCA/rootCA.pem /etc/pki/ca-trust/source/anchors/quayCA.pem
# Update the CA trustsudo update-ca-trust extract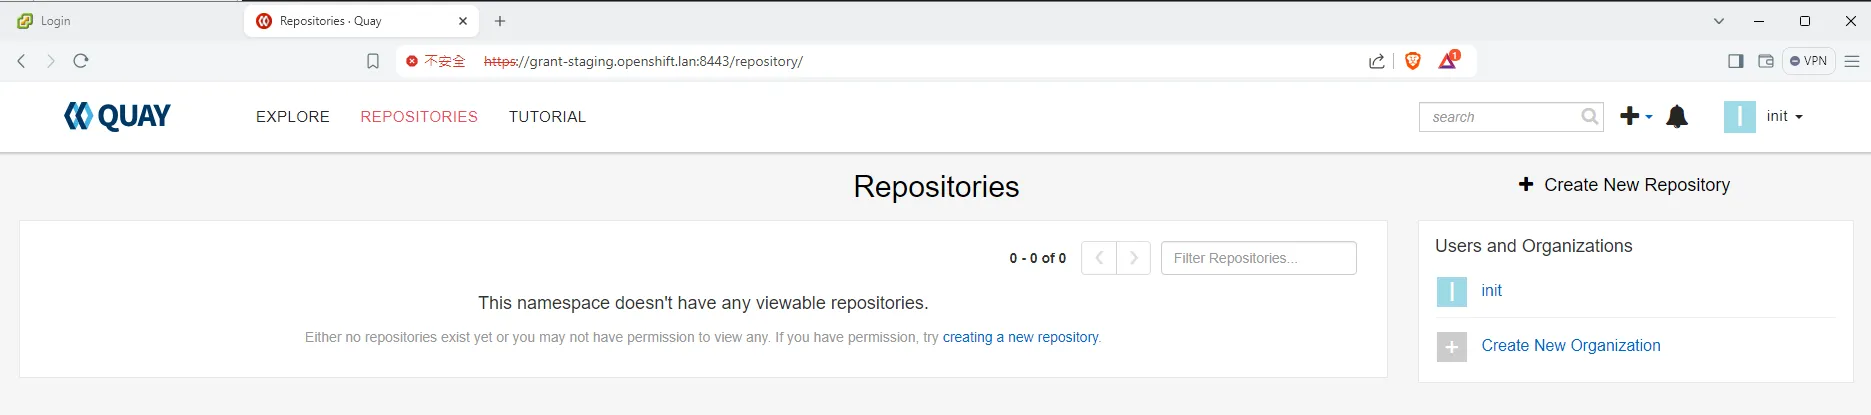
# Test mirror availability via CLIpodman login -u init -p $initPassword $quayHostname:8443- If everything has gone well up until now you should have a working quay repo:
- Next we have to actually mirror the images. To do this you’ll first need to get your pull secret. Download it from https://console.redhat.com/openshift/install/pull-secret to a file at
~/pull-secret.txt
# Export variablesexport quayHostname="your-quay-host.domain"export initPassword="your-password"
# Change to home directorycd ~
# Create ~/.docker directory if it doesn't existmkdir -p ~/.docker
# Generate base64-encoded username and password for mirror registryAUTH=$(echo -n "init:${initPassword}" | base64 -w0)
# Read the original JSON from pull-secret.txtoriginal_json=$(cat pull-secret.txt)
# Construct the new field to be addednew_field=$(cat <<EOF"$quayHostname:8443": {  "auth": "$AUTH"}EOF)
# Modify the JSON to include the new fieldmodified_json=$(jq --argjson newField "{$new_field}" '.auths += $newField' <<< "$original_json")
# Create the target directory if it does not existmkdir -p ~/.docker
# Write the modified JSON to ~/.docker/config.jsonecho "$modified_json" > ~/.docker/config.json
echo "The modified JSON has been saved to ~/.docker/config.json"- Next you need to get oc mirror and run it. First you need to log in to RedHat’s repo with the below. Make sure you use your redhat username NOT your e-mail.
podman login registry.redhat.io- Next we set up
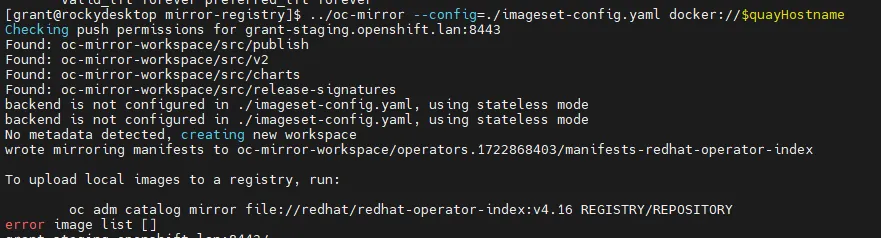
oc-mirroritself. - WARNING: I had to disable IPv6 on my interface to get this to work. I got this error because it was trying to use IPv6 to talk to RedHat’s repos. I have no idea why, but disabling IPv6 got around this.
[grant@rockydesktop mirror-registry]$ oc-mirror --config=./imageset-config.yaml docker://$quayHostnameChecking push permissions for grant-staging.openshift.lan:8443Creating directory: oc-mirror-workspace/src/publishCreating directory: oc-mirror-workspace/src/v2Creating directory: oc-mirror-workspace/src/chartsCreating directory: oc-mirror-workspace/src/release-signaturesbackend is not configured in ./imageset-config.yaml, using stateless modebackend is not configured in ./imageset-config.yaml, using stateless modeNo metadata detected, creating new workspaceerror: error retrieving mapping information for quay.io/openshift-release-dev/ocp-release@sha256:633d1d36e834a70baf666994ef375b9d1702bd1c54ab46f96c41223af9c2d150: unable to retrieve release image info: unable to read image quay.io/openshift-release-dev/ocp-release@sha256:633d1d36e834a70baf666994ef375b9d1702bd1c54ab46f96c41223af9c2d150: Get "https://quay.io/v2/": dial tcp [2600:1f18:483:cf00:69a3:473d:d206:190a]:443: connect: network is unreachable- Run the following script. Make sure you update the versions with what you need
- This assumes you still have
quayHostnamedefined in your environment from earlier.
- This assumes you still have
cat <<EOF > imageset-config.yamlkind: ImageSetConfigurationapiVersion: mirror.openshift.io/v1alpha2mirror: platform: channels: - name: stable-4.12 minVersion: 4.12.9 maxVersion: 4.12.9 operators: - catalog: registry.redhat.io/redhat/redhat-operator-index:v4.12 packages: - name: kubernetes-nmstate-operator - name: kubevirt-hyperconverged - name: serverless-operator channels: - name: stable - name: local-storage-operator - name: odf-operator - name: sriov-network-operator additionalImages: - name: registry.redhat.io/rhel8/support-tools:latest - name: registry.redhat.io/ubi8/ubi:latest helm: {}EOFoc-mirror --config=./imageset-config.yaml docker://$quayHostname:8443- WARNING: When I first ran the mirror command it hung here for a long time and I wasn’t sure if it had bugged out. I just let it sit and it did end up continuing after several minutes.
- IMPORTANT: Notice that the
oc-mirrortool creates a folder calledoc-mirror-workspaceand in that folder is aresults-XXXXXfolder. Within the results folder you will need the fileimageContentSourcePolicy.yamlfor later.
Using Local Agent
Section titled “Using Local Agent”-
Installation instructions are located here
-
On the VMWare version you also need the VMWare root certs which you can download from the vCenter home page. Ignore this if you aren’t installing on VMWare OR if you are not using VMWare for storage. That is to say, you can install against VMs without doing the VMWare setup. If you do this you should be following the instructions for bare metal NOT VMWare.
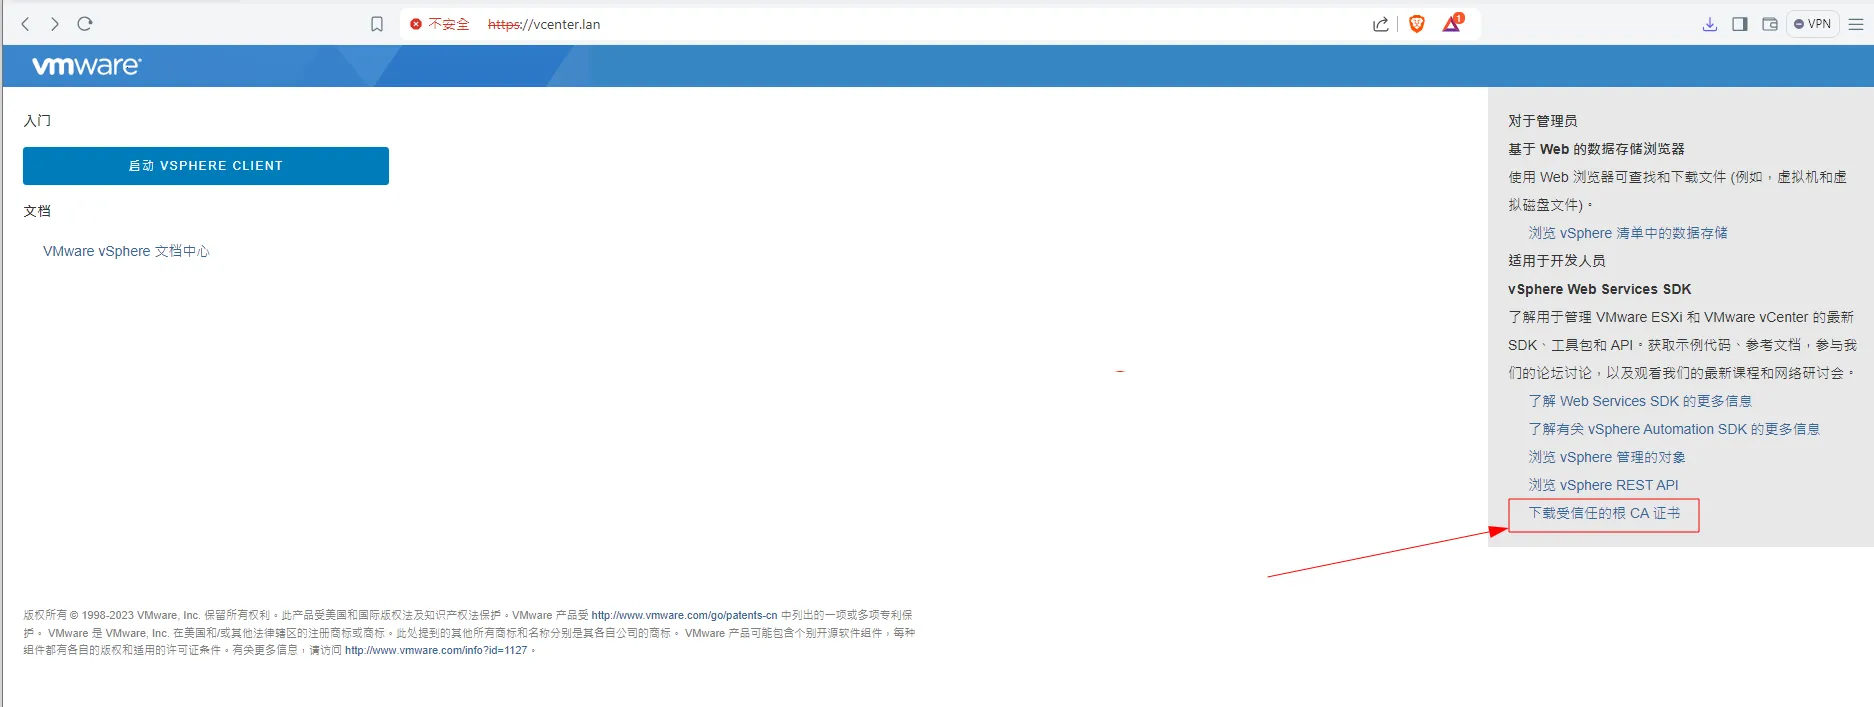
- Pulling the VMWare certs (don’t need to do if not using VMWare or not using VMWare for CSI)
# For VMWare Version - import certssudo cp certs/lin/* /etc/pki/ca-trust/source/anchorssudo update-ca-trust extract
# Make openshift install directory (if you haven't already)mkdir ~/openshift-install
# Download the Linux installer and unzipwget https://mirror.openshift.com/pub/openshift-v4/x86_64/clients/ocp/stable/openshift-install-linux.tar.gz && tar xzf openshift-install-linux.tar.gz
# Make executablechmod +x ./openshift-install
# Install nmstatectlsudo dnf install /usr/bin/nmstatectl -y- Next we need to create
agent-config.yamlandinstall-config.yaml. We’ll start withinstall-config.yaml - My configuration is available at install-config.yaml. You will need to replace it with your values. For your pull secret, you can use the same information you had in
~/.docker/config.json. You can runjq -c . ~/.docker/config.jsonto get your pull secret in a single line string. - Your SSH key you can retrieve from
cat ~/.ssh/id_rsa.pub - For
imageContentSourcesyou may remember earlier that I mentioned the folder results created fromoc-mirrorGo to your results folder and extract the part underneathrepositoryDigestMirrors. It should look something like the below. That is what needs to go under imageContentSources
spec: repositoryDigestMirrors: - mirrors: - grant-staging.openshift.lan:8443/migration-toolkit-virtualization source: registry.redhat.io/migration-toolkit-virtualization - mirrors: - grant-staging.openshift.lan:8443/rhel9 source: registry.redhat.io/rhel9 - mirrors: - grant-staging.openshift.lan:8443/openshift4 source: registry.redhat.io/openshift4 - mirrors: - grant-staging.openshift.lan:8443/openshift-serverless-1 source: registry.redhat.io/openshift-serverless-1 - mirrors: - grant-staging.openshift.lan:8443/container-native-virtualization source: registry.redhat.io/container-native-virtualization - mirrors: - grant-staging.openshift.lan:8443/ubi8 source: registry.redhat.io/ubi8 - mirrors: - grant-staging.openshift.lan:8443/source-to-image source: registry.redhat.io/source-to-image - mirrors: - grant-staging.openshift.lan:8443/rhel8 source: registry.redhat.io/rhel8 - mirrors: - grant-staging.openshift.lan:8443/openshift-serverless-1-tech-preview source: registry.redhat.io/openshift-serverless-1-tech-preview - mirrors: - grant-staging.openshift.lan:8443/odf4 source: registry.redhat.io/odf4 - mirrors: - grant-staging.openshift.lan:8443/openshift-service-mesh source: registry.redhat.io/openshift-service-mesh - mirrors: - grant-staging.openshift.lan:8443/rhceph source: registry.redhat.io/rhceph---apiVersion: operator.openshift.io/v1alpha1kind: ImageContentSourcePolicymetadata: name: release-0spec: repositoryDigestMirrors: - mirrors: - grant-staging.openshift.lan:8443/openshift/release source: quay.io/openshift-release-dev/ocp-v4.0-art-dev - mirrors: - grant-staging.openshift.lan:8443/openshift/release-images source: quay.io/openshift-release-dev/ocp-releaseBIG WARNING
BIG WARNING
BIG WARNING
Notice that there are multiple sections. YOU MUST GET ALL THE SECTIONS. If you do not, the install will fail. You will know something is wrong if during the install you login via SSH to the bootstrap mode and sudo podman images returns nothing. It means nothing is being pulled.
You only need this part of things:
- mirrors:- grant-staging.openshift.lan:8443/openshift/release source: quay.io/openshift-release-dev/ocp-v4.0-art-devBIG WARNING
BIG WARNING
BIG WARNING
- For the trust bundle values, you can use the
openssltool to extract the certs. You can use the following to get them.- WARNING: Make sure the certs are all indented correctly in the YAML file.
openssl s_client -connect <YOUR_QUAY_HOST - EX: grant-staging.openshift.lan>:8443 -showcerts </dev/null 2>/dev/null | \awk '/BEGIN CERTIFICATE/,/END CERTIFICATE/ {print $0}' > combined-cert-chain.pem- The agent configuration is available here. There’s no real trick to the agent config, fill it in with your values.
- WARNING: The NIC names are completely irrelevant, another confusing surprise. Those NIC names just have to be consistent and are used in the YAML itself to link values between the list of interfaces and the networkConfig. You could name it bananas for all it matters.
- WARNING 2 The agent installer started in 4.12, but it 4.12 can only do a single node install rendering it effectively useless until 4.13. If you are running 4.12 or prior, you have to do a user provisioned install (UPI).
- Once you have filled everything out create a tmp directory to work from and then create the installation files:
- WARNING: Do not do this in a dirty directory. There are multiple files generated during the install to include multiple hidden files. If they are still present it will fail.
- WARNING 2: Notice we are using
openshift-install agent. I did not see this clearly differentiated in the documentation -openshift-installandopenshift-install agentare two completely separate things built into one binary. The RedHad docs will freely mix the two. Do not confuse them. The difference is the agent install eliminates the need to use a bootstrapper or load balancer and replaces it with a rendezvous host.
mkdir /tmp/clustercd /tmp/cluster/mv ./agent-config.yaml /tmp/clustermv ./install-config.yaml /tmp/clusteropenshift-install agent create cluster-manifests --dir=/tmp/clusteropenshift-install agent create image --dir ./- Now you’ve generated the ISO, boot your servers with that ISO and enjoy the install.
- On VMWare, I got very annoyed having to swap out all the ISOs so I wrote this script which will go through and change all the ISOs and BIOS settings for the VMs automatically.
- You can track the status of the build with
openshift-install --dir ./ agent wait-for bootstrap-complete --log-level=debug - If you want to be able to use the
occommand, you can get yourKUBECONFIGfrom the directory in which you built the iso. The installation process consumes bothinstall-config.yamlandagent-config.yaml(no, I don’t know why but they definitely should get rid of that), but it should leave behind a directory calledauth. In the auth directory should be yourkubeconfigfile. Runexport KUBECONFIG=<ABSOLUTE_PATH_TO_KUBECONFIG>to set it up foroc. You can use commands likeoc get nodesto check the node status. You can runoc get coto see the container status. Expect the console container to be the last container to come up so patience is key. console relies on auth which relies on ingress in that order. - If you need to debug, you can ssh into the boxes with
ssh -i ~/.ssh/id_rsa <your_rendezvous_host_ip>and then runjournalctl -u assisted-service.serviceto get a full dump of the install status - After the build completes, you can run
oc whoami --show-consoleto get the address for the web console
Deploy Dell CSI Operator on OpenShift
Section titled “Deploy Dell CSI Operator on OpenShift”- I first followed the instructions I wrote for Rancher here to set up the PowerScale side of things.
- Stop when you get to the settings for K8s.
- Make sure you change the path to /ifs/data/csi. You could change the openshift files, but I found it easier to roll with the default.
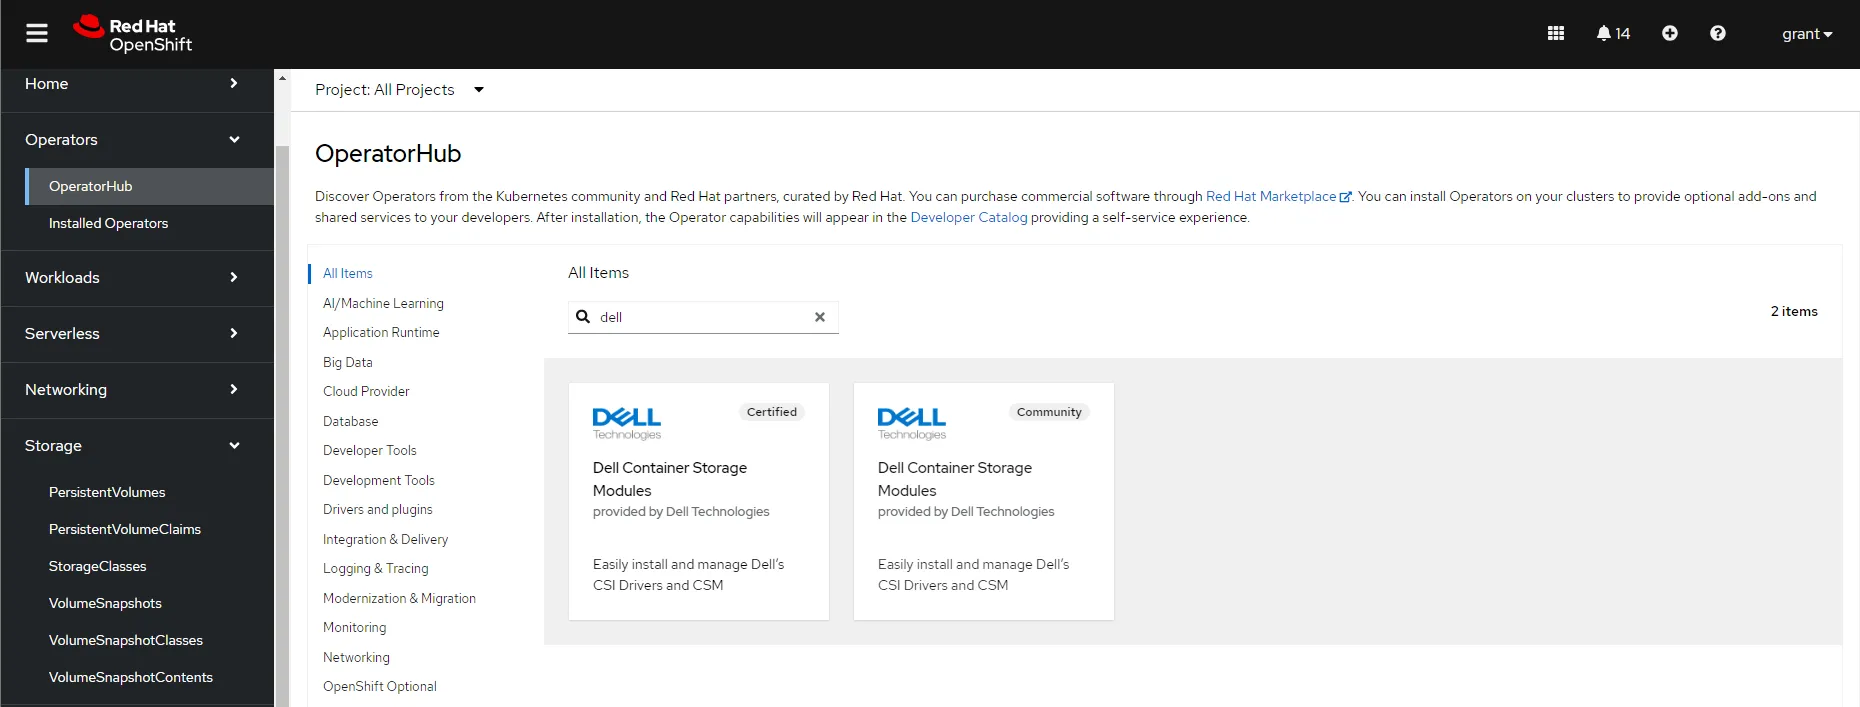
- Click on the Dell Container Storage Modules and install it with all the defaults
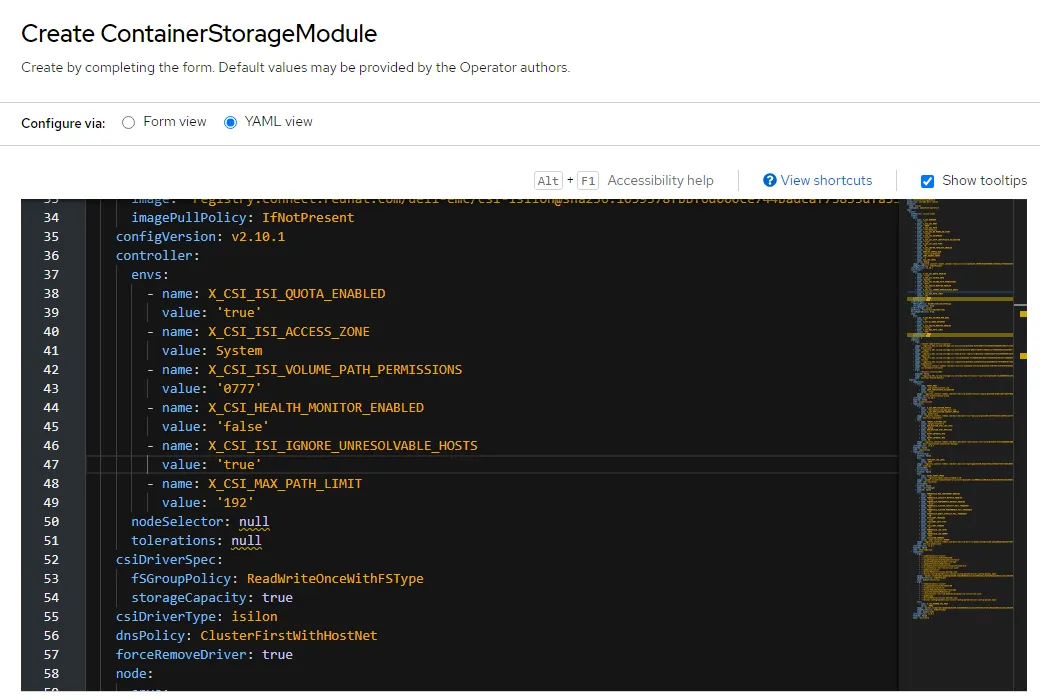
- After you have it installed, browse to the installed operator and click “Create Instance” on the Container Storage Module
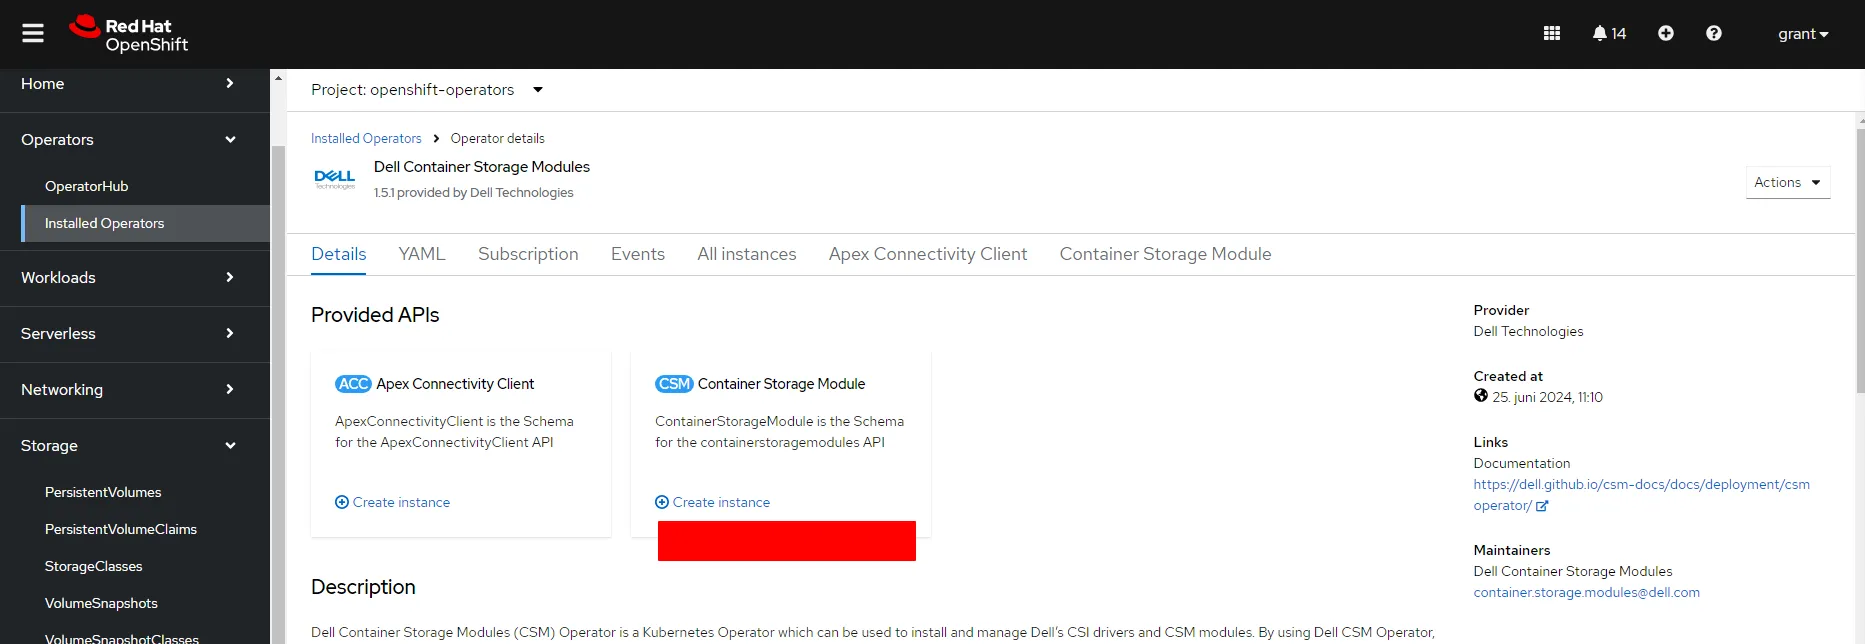
- Go to YAML view and set
X_CSI_ISI_IGNORE_UNRESOLVABLE_HOSTSto true.
- Create the below secret with the name
empty-secret.yamland then create it usingoc
[grant@rockydesktop files]$ oc create -f empty-secret.yamlsecret/isilon-certs-0 created[grant@rockydesktop files]$ cat empty-secret.yamlapiVersion: v1kind: Secretmetadata: name: isilon-certs-0 namespace: openshift-operatorstype: Opaquedata: cert-0: ""- Update the below
secret.yamlwith your data and create it in OpenShift using OC
isilonClusters:    # logical name of PowerScale Cluster  - clusterName: "powerscale"
    # username for connecting to PowerScale OneFS API server    # if authorization is enabled, username will be ignored    # Default value: None    username: "grant"
    # password for connecting to PowerScale OneFS API server    # if authorization is enabled, password will be ignored    password: "password"
    # HTTPS endpoint of the PowerScale OneFS API server    # if authorization is enabled, the endpont should be the localhost address of the csm-authorization-sidecar    # Default value: None    # Examples: "1.2.3.4", "https://1.2.3.4", "https://abc.myonefs.com"    endpoint: "10.10.25.80"
    # endpointPort: Specify the HTTPs port number of the PowerScale OneFS API server    # Formerly this attribute was named as "isiPort"    # If authorization is enabled, endpointPort must match the port specified in the endpoint parameter of the karavi-authorization-config secret    # Allowed value: valid port number    # Default value: 8080    endpointPort: 8080
    # Is this a default cluster (would be used by storage classes without ClusterName parameter)    # Allowed values:    #   true: mark this cluster config as default    #   false: mark this cluster config as not default    # Default value: false    isDefault: true
    # Specify whether the PowerScale OneFS API server's certificate chain and host name should be verified.    # Allowed values:    #   true: skip OneFS API server's certificate verification    #   false: verify OneFS API server's certificates    # Default value: default value specified in values.yaml    skipCertificateValidation: true
    # The base path for the volumes to be created on PowerScale cluster    # This will be used if a storage class does not have the IsiPath parameter specified.    # Ensure that this path exists on PowerScale cluster.    # Allowed values: unix absolute path    # Default value: default value specified in values.yaml    # Examples: "/ifs/data/csi", "/ifs/engineering"    isiPath: "/ifs/data/csi"
    # The permissions for isi volume directory path    # This will be used if a storage class does not have the IsiVolumePathPermissions parameter specified.    # Allowed values: valid octal mode number    # Default value: "0777"    # Examples: "0777", "777", "0755"    # isiVolumePathPermissions: "0777"
    # ignoreUnresolvableHosts: Ignore unresolvable hosts on the OneFS    # When set to true, OneFS allows new host to add to existing export list though any of the existing hosts from the    # same exports are unresolvable/doesn't exist anymore.    # Allowed values:    #   true: ignore existing unresolvable hosts and append new host to the existing export    #   false: exhibits OneFS default behavior i.e. if any of existing hosts are unresolvable while adding new one it fails    # Default value: false    #ignoreUnresolvableHosts: false
# Unique ID if the certificate is used to encrypt replication policy # This will be used if a replication encrypted is enabled, leave empty in case you use unecrypted replication # Allowed values: string, unique id of the certificate # Default value: "" # Examples: "dd9c736cc17e6dd5f7d85fe13528cfc20f3b4b0af4f26595d22328c8d1f461af"-
Create with
oc.oc create secret generic isilon-creds -n openshift-operators --from-file=config=secret.yaml- TODO: I had to use admin because I could not for the life of me figure out how to add the privileges to the grant user
-
On the PowerScale cluster run
isi_gconfig -t web-config auth_basic=trueunless you want to set up a real authentication mechanism. -
For the storage class I went into StorageClasses on OpenShift, created one, edited the YAML, and used:
apiVersion: storage.k8s.io/v1kind: StorageClassmetadata:  name: isilonprovisioner: csi-isilon.dellemc.comreclaimPolicy: DeleteallowVolumeExpansion: trueparameters:  # The name of the access zone a volume can be created in  # Optional: true  # Default value: default value specified in values.yaml  # Examples: System, zone1  AccessZone: System
  # The base path for the volumes to be created on PowerScale cluster.  # Ensure that this path exists on PowerScale cluster.  # Allowed values: unix absolute path  # Optional: true  # Default value: value specified in values.yaml for isiPath  # Examples: /ifs/data/csi, /ifs/engineering  IsiPath: /ifs/data/csi
  #Parameter to set Advisory Limit to quota  #Optional: true  #Default Behaviour : Limit not set  #AdvisoryLimit: "50"
  #Parameter to set soft limit to quota  #Optional: true  #Default Behaviour: Limit not set  #SoftLimit: "80"
  #Parameter which must be mentioned along with Soft Limit  #Soft Limit can be exceeded until the grace period  #Optional: true  #Default Behaviour : Limit not set  #SoftGracePrd: "86400"
  # The permissions for isi volume directory path  # This value overrides the isiVolumePathPermissions attribute of corresponding cluster config in secret, if present  # Allowed values: valid octal mode number  # Default value: "0777"  # Examples: "0777", "777", "0755"  #IsiVolumePathPermissions: "0777"
  # AccessZone groupnet service IP. Update AzServiceIP if different than endpoint.  # Optional: true  # Default value: endpoint of the cluster ClusterName  #AzServiceIP : 192.168.2.1
  # When a PVC is being created, this parameter determines, when a node mounts the PVC,  # whether to add the k8s node to the "Root clients" field or "Clients" field of the NFS export  # Allowed values:  #   "true": adds k8s node to the "Root clients" field of the NFS export  #   "false": adds k8s node to the "Clients" field of the NFS export  # Optional: true  # Default value: "false"  RootClientEnabled: "false"
  # Name of PowerScale cluster, where pv will be provisioned.  # This name should match with name of one of the cluster configs in isilon-creds secret.  # If this parameter is not specified, then default cluster config in isilon-creds secret  # will be considered if available.  # Optional: true  #ClusterName: <cluster_name>
  # Sets the filesystem type which will be used to format the new volume  # Optional: true  # Default value: None  #csi.storage.k8s.io/fstype: "nfs"
# volumeBindingMode controls when volume binding and dynamic provisioning should occur.# Allowed values:#   Immediate: indicates that volume binding and dynamic provisioning occurs once the#   PersistentVolumeClaim is created#   WaitForFirstConsumer: will delay the binding and provisioning of a PersistentVolume#   until a Pod using the PersistentVolumeClaim is created# Default value: ImmediatevolumeBindingMode: Immediate
# allowedTopologies helps scheduling pods on worker nodes which match all of below expressions.# If enableCustomTopology is set to true in helm values.yaml, then do not specify allowedTopologies# Change all instances of <ISILON_IP> to the IP of the PowerScale OneFS API server#allowedTopologies:#  - matchLabelExpressions:#      - key: csi-isilon.dellemc.com/<ISILON_IP>#        values:#          - csi-isilon.dellemc.com
# specify additional mount options for when a Persistent Volume is being mounted on a node.# To mount volume with NFSv4, specify mount option vers=4. Make sure NFSv4 is enabled on the Isilon Cluster#mountOptions: ["<mountOption1>", "<mountOption2>", ..., "<mountOptionN>"]
Set Up S3
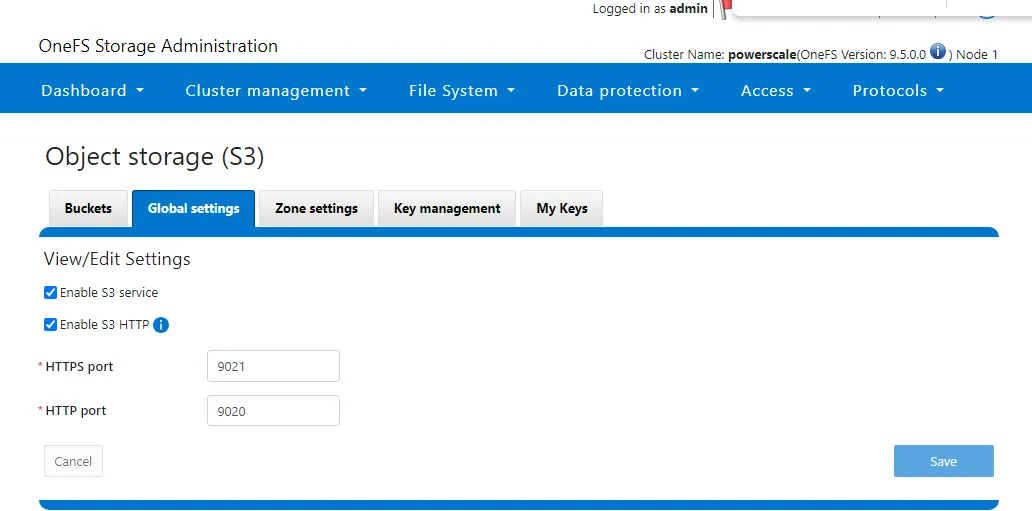
Section titled “Set Up S3”- On PowerScale you’ll need to enable S3 service and add a bucket
- Install s3cmd with
pip install s3cmd - Run
s3cmd --configure
Enter new values or accept defaults in brackets with Enter.Refer to user manual for detailed description of all options.
Access key and Secret key are your identifiers for Amazon S3. Leave them empty for using the env variables.Access Key [1_admin_accid]:Secret Key [Yt5Y7_32htTN2tw-AEP9mZS2KZ9j]:Default Region [US]: ""
Use "s3.amazonaws.com" for S3 Endpoint and not modify it to the target Amazon S3.S3 Endpoint [http://10.10.25.80:9020]: 10.10.25.80:9020
Use "%(bucket)s.s3.amazonaws.com" to the target Amazon S3. "%(bucket)s" and "%(location)s" vars can be usedif the target S3 system supports dns based buckets.DNS-style bucket+hostname:port template for accessing a bucket [""]: ''
Encryption password is used to protect your files from readingby unauthorized persons while in transfer to S3Encryption password:Path to GPG program [/usr/bin/gpg]:
When using secure HTTPS protocol all communication with Amazon S3servers is protected from 3rd party eavesdropping. This method isslower than plain HTTP, and can only be proxied with Python 2.7 or newerUse HTTPS protocol [No]:
On some networks all internet access must go through a HTTP proxy.Try setting it here if you can't connect to S3 directlyHTTP Proxy server name:
New settings:  Access Key: 1_admin_accid  Secret Key: Yt5Y7_32htTN2tw-AEP9mZS2KZ9j  Default Region: ""  S3 Endpoint: 10.10.25.80:9020  DNS-style bucket+hostname:port template for accessing a bucket: ''  Encryption password:  Path to GPG program: /usr/bin/gpg  Use HTTPS protocol: False  HTTP Proxy server name:  HTTP Proxy server port: 0
Test access with supplied credentials? [Y/n] yPlease wait, attempting to list all buckets...Success. Your access key and secret key worked fine :-)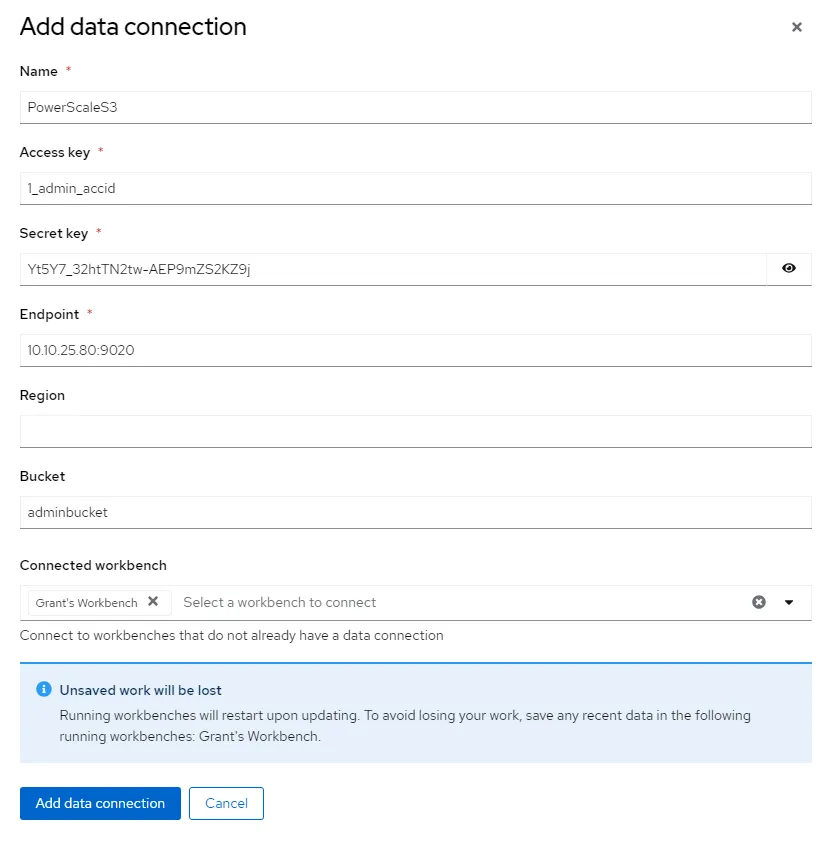
Now verifying that encryption works...Not configured. Never mind.- Add a data connecton on OpenShift AI
- WARNING: Screenshot is wrong. For the endpoint YOU MUST PUT HTTP:// This is the opposite of the s3cmd command line where it won’t work if you add
http:// - If you need to troubleshoot pipelines, run
oc get pods -n redhat-ods-applicationsto get the name of all your application pods. Then you can ranoc describe pod openshift-pipelines-operator-69dd8bdfc4-cqxpr -n openshift-operators(update with your index) to get the pipeline pod logs.
- WARNING: Screenshot is wrong. For the endpoint YOU MUST PUT HTTP:// This is the opposite of the s3cmd command line where it won’t work if you add
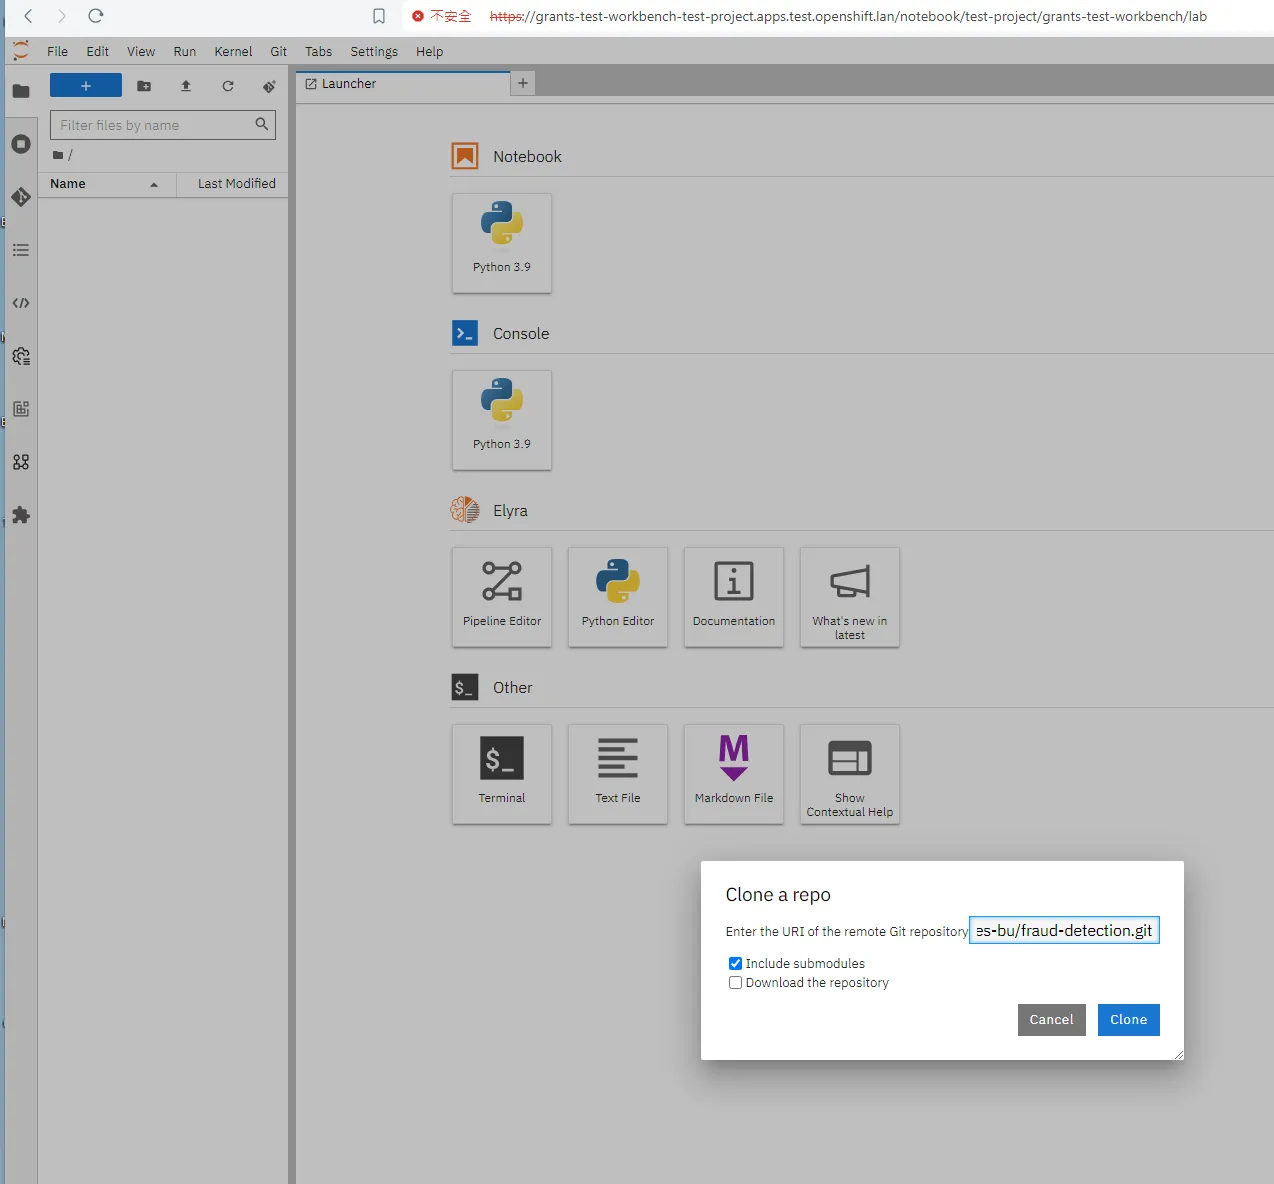
- Setting up a workbench
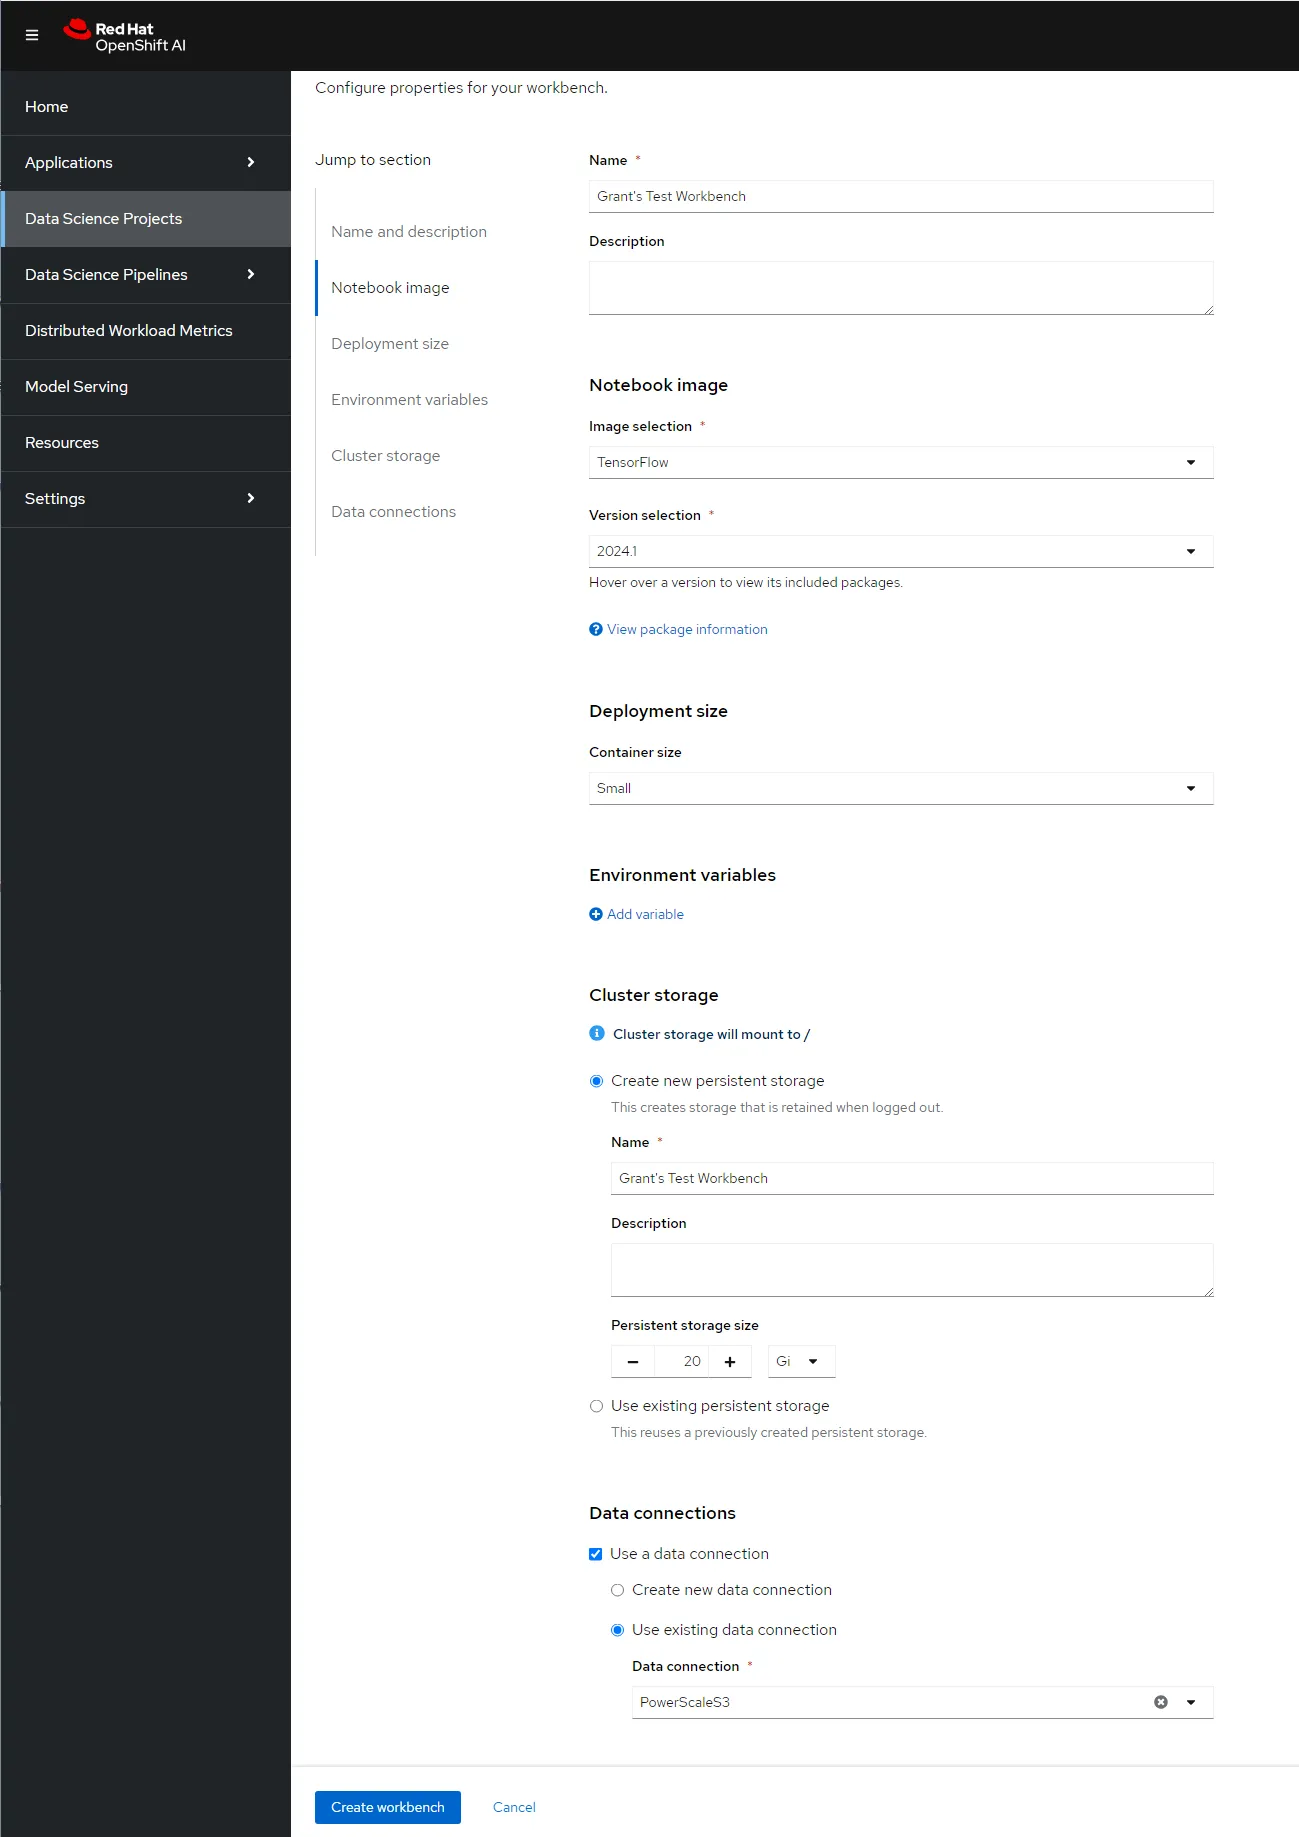
git clone
Accessing the System
Section titled “Accessing the System”[rosa@bastion ~]$ oc login --username cluster-admin --password VEQnI-EBKuH-PHxpY-IPIPE https://api.rosa-mqzmw.r0s7.p3.openshiftapps.com:443Login successful.
You have access to 78 projects, the list has been suppressed. You can list all projects with 'oc projects'
Using project "default".Welcome! See 'oc help' to get started.[rosa@bastion ~]$ oc whoamicluster-admin[rosa@bastion ~]$ oc whoami --show-consolehttps://console-openshift-console.apps.rosa.rosa-mqzmw.r0s7.p3.openshiftapps.com[rosa@bastion ~]$Identity Providers
Section titled “Identity Providers”- The first time you login you use a temporary admin and then you can add an identity provider:
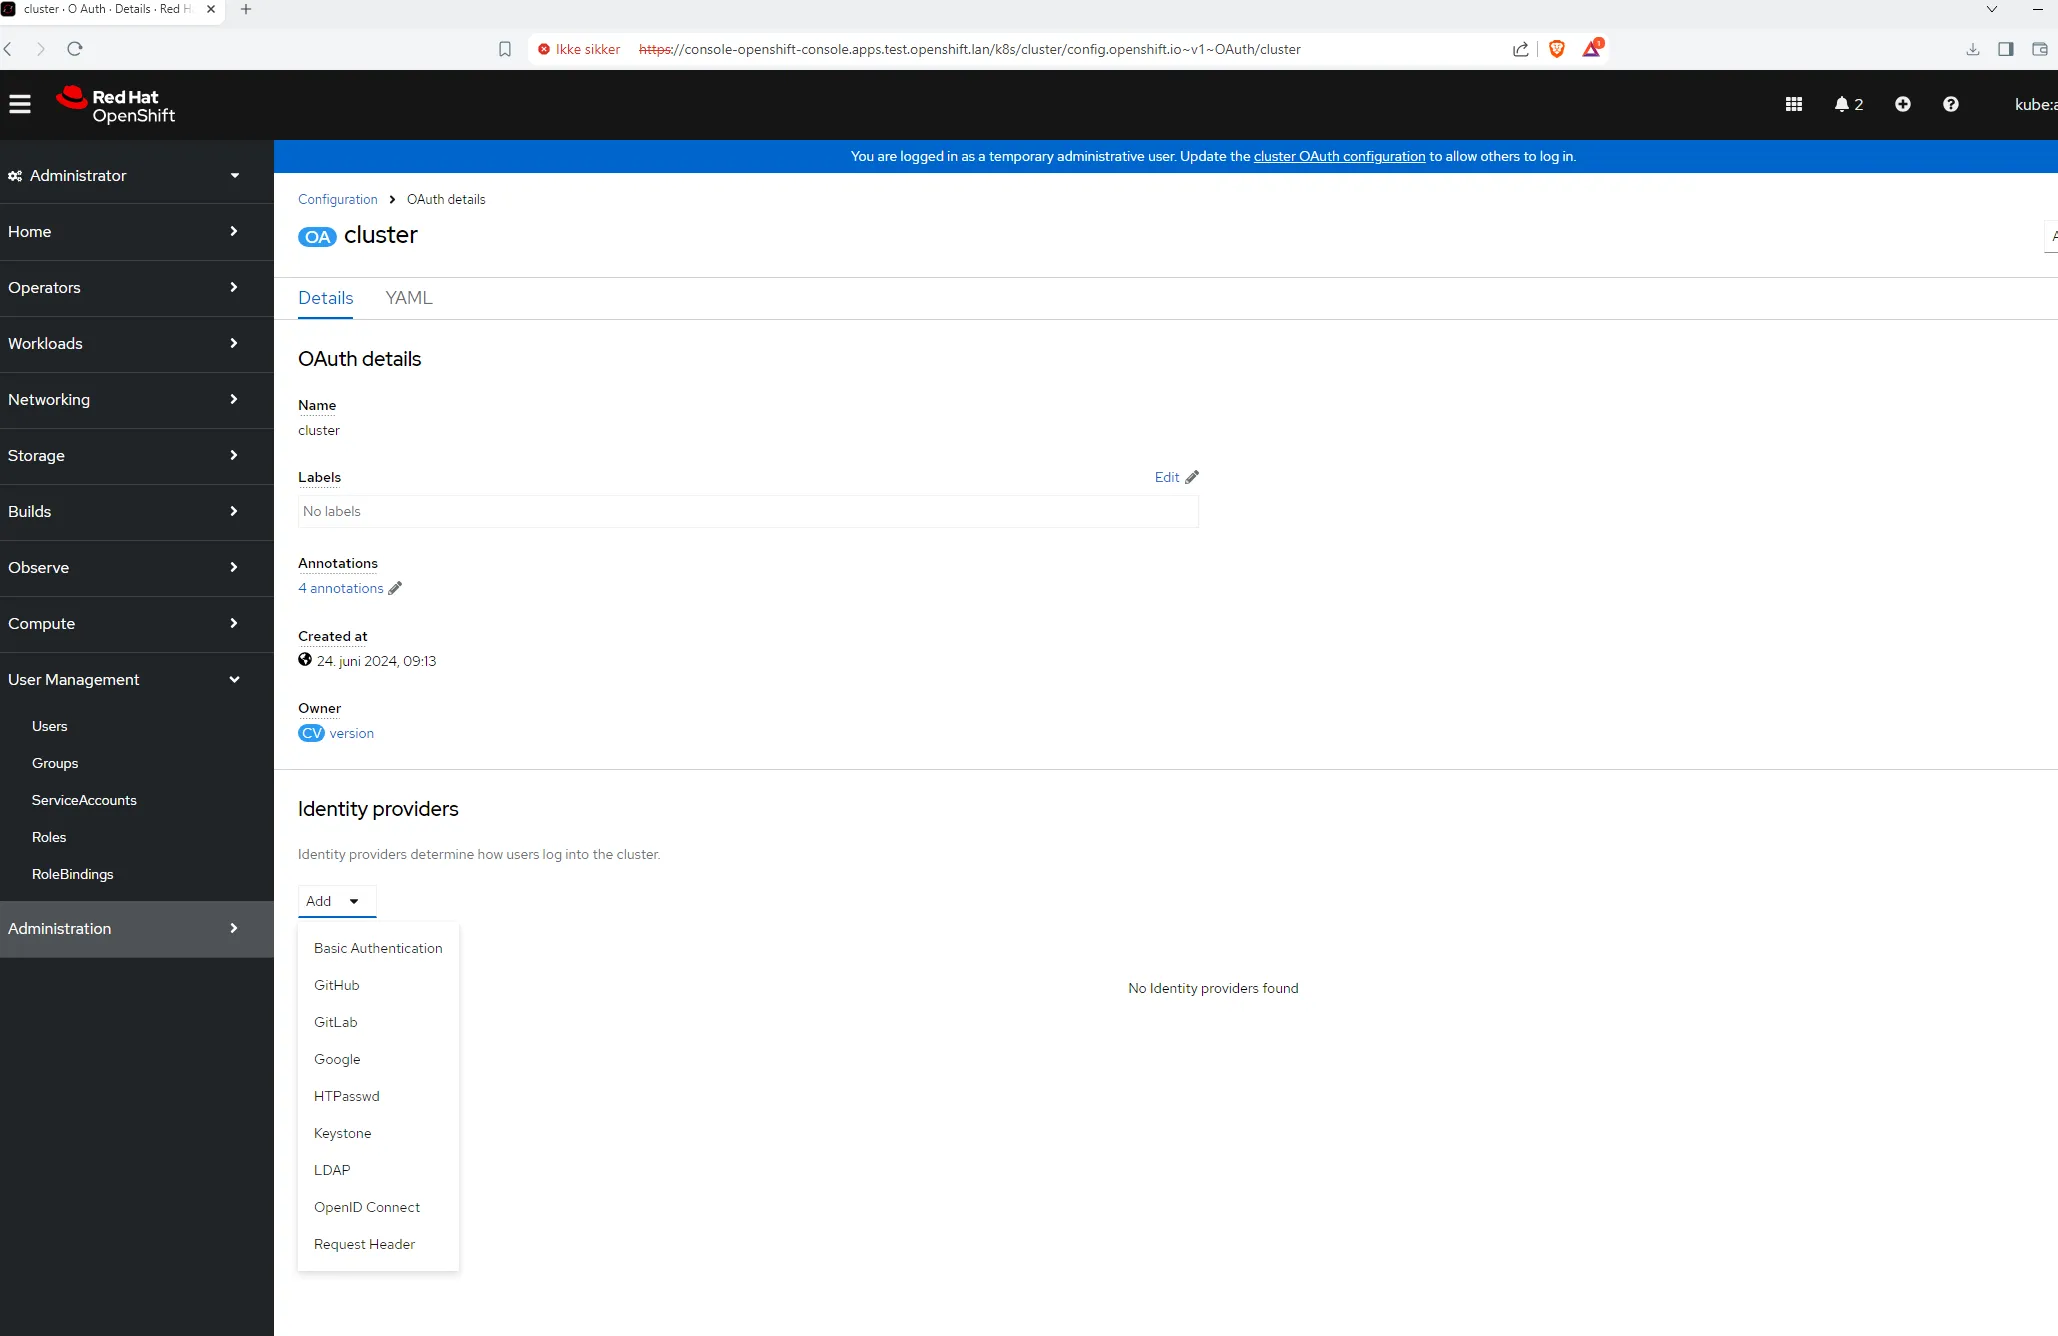
- I just wanted to do a username/password so I did the below and uploaded the file for htpasswd.
sudo dnf install -y httpd-toolshtpasswd -c /home/grant/password grantUnderstand OpenShift Networking
Section titled “Understand OpenShift Networking”From the docs we know there are the following components:
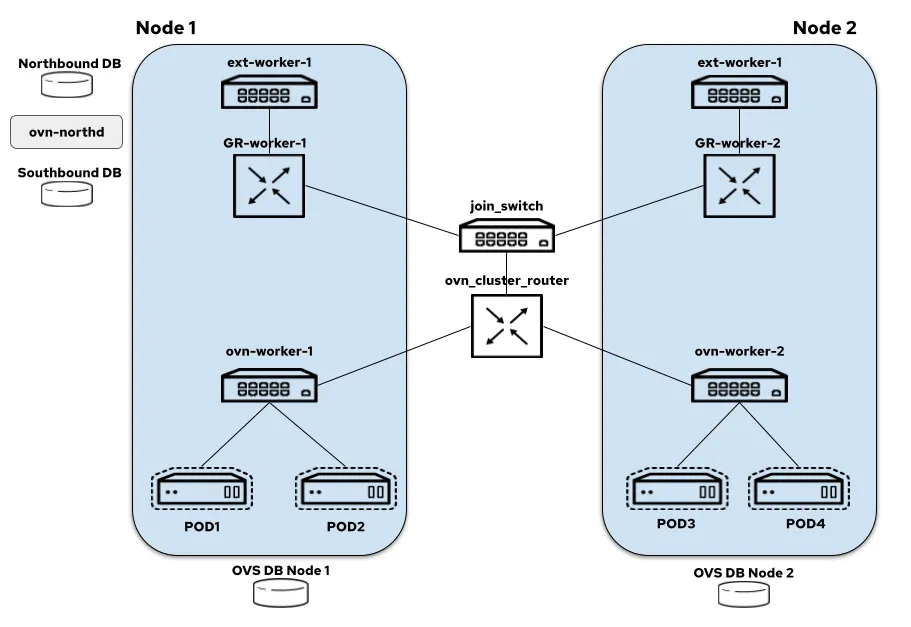
- node-local-switch: all the logical switch ports for the pods created on a node are bound to this switch and it also hosts load balancers that take care of DNAT-ing the service traffic
- distributed-ovn-cluster-router: it’s responsible for tunnelling overlay traffic between the nodes and also routing traffic between the node switches and gateway router’s
- distributed-join-switch: connects the ovn-cluster-router to the gateway routers
- node-local-gateway-router: it’s responsible for north-south traffic routing and connects the join switch to the external switch and it also hosts load balancers that take care of DNAT-ing the service traffic
- node-local-external-switch: connects the gateway router to the external bridge
To this end, I went and pulled the OVS config off of my cluster:
sudo ovs-vsctl showb162d944-c8a3-4318-9ebe-b3b1fe2ebc45 Bridge br-int fail_mode: secure datapath_type: system Port "9d67534f628003c" Interface "9d67534f628003c" Port "220bd9d34b05ff4" Interface "220bd9d34b05ff4" Port ccc10faab05e0c3 Interface ccc10faab05e0c3 Port "101964cf2513870" Interface "101964cf2513870" Port "3025424a700befa" Interface "3025424a700befa" Port fc6b0ac46ee67d0 Interface fc6b0ac46ee67d0 Port c682ae728630785 Interface c682ae728630785 Port "09e426369137882" Interface "09e426369137882" Port "42f6eb06e94a8d3" Interface "42f6eb06e94a8d3" Port "34687c6eadaf73d" Interface "34687c6eadaf73d" Port "199c158819efdd2" Interface "199c158819efdd2" Port "325cd19c4cdf788" Interface "325cd19c4cdf788" Port d32dfbe0d75fd4a Interface d32dfbe0d75fd4a Port "8c3ea39a75498a7" Interface "8c3ea39a75498a7" Port br-int Interface br-int type: internal Port "0c7e54c2091f93f" Interface "0c7e54c2091f93f" Port "4e390191e79cf41" Interface "4e390191e79cf41" Port "2626d19ab0fee56" Interface "2626d19ab0fee56" Port d98e9af9aebbf32 Interface d98e9af9aebbf32 Port "1b8837f5863d75d" Interface "1b8837f5863d75d" Port "1b6e5b90ed4e46c" Interface "1b6e5b90ed4e46c" Port "888b9e7da0e790b" Interface "888b9e7da0e790b" Port "1fe2b4d9057916c" Interface "1fe2b4d9057916c" Port c02c20ee9a537fe Interface c02c20ee9a537fe Port ce68d0e70b72754 Interface ce68d0e70b72754 Port c115949c8127c7d Interface c115949c8127c7d Port "88618dc5d56f9f0" Interface "88618dc5d56f9f0" Port "51d2137e7b5df4a" Interface "51d2137e7b5df4a" Port "037619c1e496730" Interface "037619c1e496730" Port "31e970eaac7dcc7" Interface "31e970eaac7dcc7" Port "19762a507da7747" Interface "19762a507da7747" Port "87ffd780e84e11b" Interface "87ffd780e84e11b" Port "61cba8ea4cf80de" Interface "61cba8ea4cf80de" Port d1657c3485ebca6 Interface d1657c3485ebca6 Port "1b510d8b97b1e72" Interface "1b510d8b97b1e72" Port "53f53eb9134accf" Interface "53f53eb9134accf" Port bccb70feea9ed77 Interface bccb70feea9ed77 Port "065924fb2665da2" Interface "065924fb2665da2" Port "90396ed0cecbc13" Interface "90396ed0cecbc13" Port "5a04215eee12652" Interface "5a04215eee12652" Port b114337f2e9eb97 Interface b114337f2e9eb97 Port "2b01f07c5012e10" Interface "2b01f07c5012e10" Port "0722cbca14bf74d" Interface "0722cbca14bf74d" Port "5de0d8d897ed833" Interface "5de0d8d897ed833" Port fc2033d1a0cf5dc Interface fc2033d1a0cf5dc Port cc7fb3b50d3f9c1 Interface cc7fb3b50d3f9c1 Port "8b9c96d9b27cf6e" Interface "8b9c96d9b27cf6e" Port "269037e39f92171" Interface "269037e39f92171" Port "1a3a9538b5d4247" Interface "1a3a9538b5d4247" Port "433ecc639cdb6b1" Interface "433ecc639cdb6b1" Port c27ffaecbecde0b Interface c27ffaecbecde0b Port "845850c4e6cf71b" Interface "845850c4e6cf71b" Port "7ddb555a4da2886" Interface "7ddb555a4da2886" Port "733ce64ff827e3b" Interface "733ce64ff827e3b" Port "2b1b6f84adc9551" Interface "2b1b6f84adc9551" Port "92dc1017fdf9828" Interface "92dc1017fdf9828" Port "286aa6ee245a88e" Interface "286aa6ee245a88e" Port e38c98f5cbc0b80 Interface e38c98f5cbc0b80 Port "7ec6321089ae248" Interface "7ec6321089ae248" Port "07d7a1d8fb17e56" Interface "07d7a1d8fb17e56" Port "398ea561b912799" Interface "398ea561b912799" Port "88a6e1c5dfadb3e" Interface "88a6e1c5dfadb3e" Port "4434f56df4a51d2" Interface "4434f56df4a51d2" Port ecb6691f061911f Interface ecb6691f061911f Port "47da0f8eb7c88b4" Interface "47da0f8eb7c88b4" Port "4c71b7b45b46049" Interface "4c71b7b45b46049" Port e579198df3b793a Interface e579198df3b793a Port f5b3469ce8f694e Interface f5b3469ce8f694e Port bee315fab0230ab Interface bee315fab0230ab Port de74da61a067ccf Interface de74da61a067ccf Port "1a696a6b3111d14" Interface "1a696a6b3111d14" Port abf2eff21ef3887 Interface abf2eff21ef3887 Port ovn-k8s-mp0 Interface ovn-k8s-mp0 type: internal Port "95eb158784dc33b" Interface "95eb158784dc33b" Port e91b9e2d8740c2f Interface e91b9e2d8740c2f Port "044e9eb98b6be5c" Interface "044e9eb98b6be5c" Port f1873deeb7e47aa Interface f1873deeb7e47aa Port a96b99f80050bcd Interface a96b99f80050bcd Port ece1db9d37f63c1 Interface ece1db9d37f63c1 Port aab86e122f66f97 Interface aab86e122f66f97 Port a7f97709f3848a4 Interface a7f97709f3848a4 Port "9cfa26213bbcdf6" Interface "9cfa26213bbcdf6" Port "66b0d1ec2c20052" Interface "66b0d1ec2c20052" Port "799eb9f534905d9" Interface "799eb9f534905d9" Port ad3f481a08151c9 Interface ad3f481a08151c9 Port "404141d7ef876c5" Interface "404141d7ef876c5" Port a74eb07b47dc0a7 Interface a74eb07b47dc0a7 Port cfa76b640e19418 Interface cfa76b640e19418 Port "395b9b684212974" Interface "395b9b684212974" Port "940c2cf56f9a5f2" Interface "940c2cf56f9a5f2" Port c8225e494ec809e Interface c8225e494ec809e Port "7cf4e47fbdcabda" Interface "7cf4e47fbdcabda" Port "46f6edc707accf3" Interface "46f6edc707accf3" Port "44bdf69e9f3ef04" Interface "44bdf69e9f3ef04" Port "42767ccc80b9fc8" Interface "42767ccc80b9fc8" Port a6f4be438325900 Interface a6f4be438325900 Port "2ce5f5875d03c92" Interface "2ce5f5875d03c92" Port "45648275f0c78d4" Interface "45648275f0c78d4" Port "2912ae8c3b5c59d" Interface "2912ae8c3b5c59d" Port "7014d5029019978" Interface "7014d5029019978" Port "0901bccf4058021" Interface "0901bccf4058021" Port "0bff3a877f7b5ca" Interface "0bff3a877f7b5ca" Port d9de58b5f99c22b Interface d9de58b5f99c22b Port c50854cfe5ac6bc Interface c50854cfe5ac6bc Port "3bd4ce9ea335726" Interface "3bd4ce9ea335726" Port "389f7d86664ba25" Interface "389f7d86664ba25" Port "109dce3614fe9dd" Interface "109dce3614fe9dd" Port "9563654e13c12d2" Interface "9563654e13c12d2" Port cf184b7c4426201 Interface cf184b7c4426201 Port "3fafaa74deb4b12" Interface "3fafaa74deb4b12" Port "91e1b1af8d508d7" Interface "91e1b1af8d508d7" Port da508703ed9e601 Interface da508703ed9e601 Port c2460ea21748561 Interface c2460ea21748561 Port "53f9225d9e9ef54" Interface "53f9225d9e9ef54" Port "5f7fe81f1fdfdba" Interface "5f7fe81f1fdfdba" Port "81e618a95fd3069" Interface "81e618a95fd3069" Port "670ba81a4b72a8b" Interface "670ba81a4b72a8b" Port "5f432a944112075" Interface "5f432a944112075" Port "6ad9dc62b69ee02" Interface "6ad9dc62b69ee02" Port ddcf3d63a6060c9 Interface ddcf3d63a6060c9 Port "04bf81f8d2124d2" Interface "04bf81f8d2124d2" Port "103c51e6ad82fc0" Interface "103c51e6ad82fc0" Port bcc59c45a69db0b Interface bcc59c45a69db0b Port "15c87d27ea1b633" Interface "15c87d27ea1b633" Port "3da344b00d9e267" Interface "3da344b00d9e267" Port cdcfaaefeb72b93 Interface cdcfaaefeb72b93 Port "063f129ed22d382" Interface "063f129ed22d382" Port "3edee70301e5d44" Interface "3edee70301e5d44" Port "44bd2f0bb04e7f6" Interface "44bd2f0bb04e7f6" Port "96c391a9bcf76d7" Interface "96c391a9bcf76d7" Port "8e91e05c75a93f9" Interface "8e91e05c75a93f9" Port "8217fc100d4c064" Interface "8217fc100d4c064" Port "8d41d82ae32d362" Interface "8d41d82ae32d362" Port "64e652f8ea80d13" Interface "64e652f8ea80d13" Port "5b88ebf6f5686f1" Interface "5b88ebf6f5686f1" Port "4e92fe5b30ce8c1" Interface "4e92fe5b30ce8c1" Port "64935419185b671" Interface "64935419185b671" Port "21903391bbc9632" Interface "21903391bbc9632" Port ba74ec6c39317f1 Interface ba74ec6c39317f1 Port "7dcd99ac11fd00e" Interface "7dcd99ac11fd00e" Port "1f4d6ccb9e915b3" Interface "1f4d6ccb9e915b3" Port "6a807c99d851d79" Interface "6a807c99d851d79" Port "7b30cce2e0239d8" Interface "7b30cce2e0239d8" Port patch-br-int-to-br-ex_b0-7b-25-e9-b2-a4 Interface patch-br-int-to-br-ex_b0-7b-25-e9-b2-a4 type: patch options: {peer=patch-br-ex_b0-7b-25-e9-b2-a4-to-br-int} Port d44a55818594920 Interface d44a55818594920 Port "8410c871cfe580c" Interface "8410c871cfe580c" Port "851c6fbc9ca6c64" Interface "851c6fbc9ca6c64" Port "0eb976b089880b1" Interface "0eb976b089880b1" Port "26aa2e08684a6ad" Interface "26aa2e08684a6ad" Port "2080447b809e4de" Interface "2080447b809e4de" Port "5ffb83c2457f3a6" Interface "5ffb83c2457f3a6" Port "79886aca46ee2f8" Interface "79886aca46ee2f8" Port "6984f72105f858c" Interface "6984f72105f858c" Bridge br-ex Port br-ex Interface br-ex type: internal Port patch-br-ex_b0-7b-25-e9-b2-a4-to-br-int Interface patch-br-ex_b0-7b-25-e9-b2-a4-to-br-int type: patch options: {peer=patch-br-int-to-br-ex_b0-7b-25-e9-b2-a4} Port eno1.125 Interface eno1.125 type: system ovs_version: "3.3.1"Let’s relate the components from your ovs-vsctl show output to the descriptions in the OVN Kubernetes documentation:
-
node-local-switch:
- Description: All the logical switch ports for the pods created on a node are bound to this switch and it also hosts load balancers that take care of DNAT-ing the service traffic.
- In my setup: This corresponds to
br-int. It connects all pod interfaces and manages the internal pod network.
-
distributed-ovn-cluster-router:
- Description: Responsible for tunneling overlay traffic between the nodes and also routing traffic between the node switches and gateway routers.
- In my setup: This is represented by
ovn-k8s-mp0. It handles overlay networking and ensures communication between nodes in the cluster via tunnels.
-
distributed-join-switch - I don’t have this because I did a single node physical build.
-
node-local-gateway-router:
- Description: It’s responsible for north-south traffic routing and connects the join switch to the external switch and it also hosts load balancers that take care of DNAT-ing the service traffic.
- In your setup: This is likely part of the configuration that connects
br-inttobr-exthrough the patch ports. It handles routing traffic from the internal network to the external network.
-
node-local-external-switch:
- Description: Connects the gateway router to the external bridge.
- In your setup: This corresponds to
br-ex. It connects to the external network through the physical interfaceeno1.125and facilitates communication between the node and the external network.
Summary of the Mapping
Section titled “Summary of the Mapping”br-int: Functions as the node-local-switch, managing internal pod network and connecting various logical interfaces for pods.ovn-k8s-mp0: Acts as part of the distributed-ovn-cluster-router, handling overlay traffic between nodes.br-ex: Acts as the node-local-external-switch, facilitating external connectivity througheno1.125.- Patch Ports (
patch-br-int-to-br-exandpatch-br-ex-to-br-int): These ports connectbr-intandbr-ex, supporting the role of node-local-gateway-router in managing north-south traffic routing and connectivity between internal and external networks.
By examining this configuration, you can see how each component of your OVS setup corresponds to the elements described in the OVN Kubernetes documentation, enabling effective network management and traffic routing within your OpenShift cluster.