Run VPN on OS10
My Configuration
Section titled “My Configuration”Dell 4112F-ON
Section titled “Dell 4112F-ON” Dell EMC Networking OS10 Enterprise Copyright (c) 1999-2020 by Dell Inc. All Rights Reserved. OS Version: 10.5.0.4 Build Version: 10.5.0.4.638 Build Time: 2020-01-30T21:08:56+0000 System Type: S4112F-ON Architecture: x86_64 Up Time: 2 days 03:54:07CentOS
Section titled “CentOS” [root@centos ~]# cat /etc/*-release CentOS Linux release 7.6.1810 (Core) NAME="CentOS Linux" VERSION="7 (Core)" ID="centos" ID_LIKE="rhel fedora" VERSION_ID="7" PRETTY_NAME="CentOS Linux 7 (Core)" ANSI_COLOR="0;31" CPE_NAME="cpe:/o:centos:centos:7" HOME_URL="https://www.centos.org/" BUG_REPORT_URL="https://bugs.centos.org/"
CENTOS_MANTISBT_PROJECT="CentOS-7" CENTOS_MANTISBT_PROJECT_VERSION="7" REDHAT_SUPPORT_PRODUCT="centos" REDHAT_SUPPORT_PRODUCT_VERSION="7"
CentOS Linux release 7.6.1810 (Core) CentOS Linux release 7.6.1810 (Core)Testing Topology
Section titled “Testing Topology”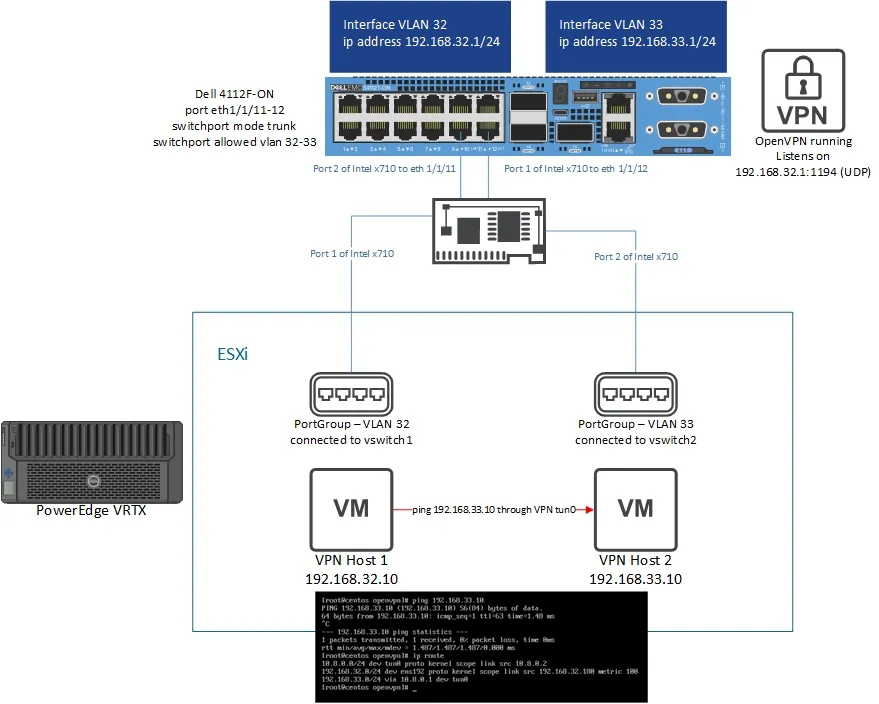
Research Sources
Section titled “Research Sources”NPU Interface Problem
Section titled “NPU Interface Problem”The one big gotcha with doing this is that when you drop to the command line in
OS10 and do a ip a s, the interfaces you see that look like physical interfaces
ex:
13: e101-001-0: <BROADCAST,MULTICAST,UP,LOWER_UP> mtu 1500 qdisc multiq master br32 state UP group default qlen 1000 link/ether 50:9a:4c:d6:0a:71 brd ff:ff:ff:ff:ff:ff14: e101-002-0: <BROADCAST,MULTICAST> mtu 1500 qdisc noop master br1 state DOWN group default qlen 1000 link/ether 50:9a:4c:d6:0a:72 brd ff:ff:ff:ff:ff:ff15: e101-003-0: <BROADCAST,MULTICAST> mtu 1500 qdisc noop master br1 state DOWN group default qlen 1000 link/ether 50:9a:4c:d6:0a:73 brd ff:ff:ff:ff:ff:ff16: e101-004-0: <BROADCAST,MULTICAST> mtu 1500 qdisc noop master br1 state DOWN group default qlen 1000 link/ether 50:9a:4c:d6:0a:74 brd ff:ff:ff:ff:ff:ffare not actual physical interfaces. Under the hood the operating system is actually
using tap interfaces. Inside the switch there are two processors - a regular x86
processor and a separate processor called the Network Processing Unit (NPU). The
interfaces are connected to the NPU. Most traffic that comes in on the physical interfaces
managed by the NPU does not flow up to the x86 chip. This means that if you do
a tcpdump on one of the interfaces you see in ip a s you will see very little.
In fact, the only traffic you will see is management traffic which is handled
by the Linux kernel.
This means if you want to set up a VPN you have to have a way to make sure all the traffic is visible to the Linux kernel. Fortunately, there is a way to make this happen. VLAN interfaces are virtual and subsequently are handled entirely by the Linux kernel. In fact, VLAN interfaces actually show up under the hood as bridge interfaces:
29: br32: <BROADCAST,MULTICAST,PROMISC,UP,LOWER_UP> mtu 1500 qdisc noqueue state UP group default qlen 1000 link/ether 50:9a:4c:d6:0a:a1 brd ff:ff:ff:ff:ff:ff inet 192.168.32.1/24 brd 255.168.32.255 scope global br32 valid_lft forever preferred_lft forever inet6 fe80::529a:4cff:fed6:aa1/64 scope link valid_lft forever preferred_lft forever41: br33: <BROADCAST,MULTICAST,PROMISC,UP,LOWER_UP> mtu 1500 qdisc noqueue state UP group default qlen 1000 link/ether 50:9a:4c:d6:0a:a1 brd ff:ff:ff:ff:ff:ff inet 192.168.33.1/24 brd 255.168.33.255 scope global br33 valid_lft forever preferred_lft forever inet6 fe80::529a:4cff:fed6:aa1/64 scope link valid_lft forever preferred_lft foreverThese two correspond to interface vlans 32 and 33. By using VLAN interfaces you can tie the VPN to these interfaces and everything works just fine. You just place any associated physical interfaces as access VLANs or trunks with the appropriate allowed VLANs.
Installing OpenVPN as a Server on the 4112F-ON
Section titled “Installing OpenVPN as a Server on the 4112F-ON”Note: I ran a VPN server on my switch, but you could just as easily make the switch a point to point VPN gateway connecting to a PFSense instance such that anything that can reach the switch could participate in a multipoint network.
On the 4112F-ON:
-
Enter configuration mode from user mode by running
enand thenconfig <enter> -
Run
ip name-server 192.168.1.1to add a name server. -
Run
write memin enable mode to save your configuration changes. -
Run
system bash -
Before continuing, make sure that the time is correct on the device. WARNING If you do not do this and you generate certificates, none of the encryption will work and you will have to recreate all of your certificates!
-
Run
sudo apt-get install -y openvpn vim. I installedvimbecause I don’t hate myself. -
I used this script from git.io/vpn to install OpenVPN. Having done the entire thing manually before, I can tell you this saves a huge amount of time.
-
To run the script run
wget https://git.io/vpn -O openvpn-install.sh && chmod +x openvpn-install.sh && ./openvpn-install.sh1.Fill in the options as needed. -
I did find some things you have to tweak with their script. Perform the below to clean things up. 1.Run
vim /lib/systemd/system/openvpn@.service. Where it says--config /etc/openvpn/%i.conf, change that to--config /etc/openvpn/%i/%i.conf. For details on specifies work see this post. When you are done runsystemctl daemon-reloadto reload the systemd daemon. 2.If you used my version of the script then you do not need to do this. Otherwise you need to runvim /etc/openvpn/server/server.confand you need to prepend/etc/openvpn/server/on several of the paths or the service won’t start. See my config below:local 192.168.32.1port 1194proto udpdev tunca /etc/openvpn/server/ca.crtcert /etc/openvpn/server/server.crtkey /etc/openvpn/server/server.keydh /etc/openvpn/server/dh.pemauth SHA512tls-crypt /etc/openvpn/server/tc.keytopology subnetserver 10.8.0.0 255.255.255.0ifconfig-pool-persist ipp.txtpush "redirect-gateway def1 bypass-dhcp"push "dhcp-option DNS 192.168.1.1"keepalive 10 120cipher AES-256-CBCuser nobodygroup nogrouppersist-keypersist-tunstatus openvpn-status.logverb 3crl-verify /etc/openvpn/server/crl.pemexplicit-exit-notify -
You may want to add something like
push route 192.168.1.0 255.255.255.0to your server config. This allows the server to push routes to the client. For example, in my case the 192.168.1.0/24 network is behind my server, so I have to push a route so that the clients know how to get to it. Just keep in mind, that hosts on your distant network must have a route back to your VPN network. -
Run
systemctl start openvpn@serverto start the server. -
Rerun the script to add clients. Your output should look like the below. In my case I added one client to perform the test.
```Looks like OpenVPN is already installed.What do you want to do?1) Add a new user2) Revoke an existing user3) Remove OpenVPN4) ExitSelect an option: 1Tell me a name for the client certificate.Client name: test-clientUsing SSL: openssl OpenSSL 1.1.0l 10 Sep 2019Generating a RSA private key........+++++.......+++++writing new private key to '/etc/openvpn/server/easy-rsa/pki/private/test-client.key.WONcIB6m1N'-----Using configuration from ./safessl-easyrsa.cnfCheck that the request matches the signatureSignature okThe Subject's Distinguished Name is as followscommonName :ASN.1 12:'test-client'Certificate is to be certified until Mar 9 00:13:09 2030 GMT (3650 days)Write out database with 1 new entriesData Base UpdatedClient test-client added, configuration is available at: /root/test-client.ovpn``` -
Copy the contents of your client config. In my case this was from
/root/test-client.ovpnand it looked like:clientdev tunproto udpremote <SERVER ADDRESS> 1194resolv-retry infinitenobindpersist-keypersist-tunremote-cert-tls serverauth SHA512cipher AES-256-CBCignore-unknown-option block-outside-dnsblock-outside-dnsverb 3<ca>-----BEGIN CERTIFICATE-----MIIDKzCCAhOgAwIBAgIJANmH49pJjiOUMA0GCSqGSIb3DQEBCwUAMBMxETAPBgNVBAMMCENoYW5nZU1lMB4XDTIwMDMxMTAwMTA1M1oXDTMwMDMwOTAwMTA1M1owEzERMA8GA1UEAwwIQ2hhbmdlTWUwggEiMA0GCSqGSIb3DQEBAQUAA4IBDwAwggEKAoIBAQD5FZJN5STAXRX7ZBq8CVf7DntSQTgnVVqwntKJwggTPHgwn8uMUWRdaIpXZVN5MYTGPCICDoxdlF/2KUgH9n/L1Rlmm9RW4beXMwFJUR8NIExf5vQy03gk6JpEO1DAPu+x0/EhXGvGo/lAEpF4rk0ZPpNEkFM71bIqhKAMAe9M5c2ZrAxqplyTz/Zl4nRmYQSsqnx3ikN+SkxdnifIBlF3MzCHqCCV9QaOkrztXHs9XFhnWpyu+OLqyP5+ipOZgYsTDA4otjv6D9MX+BoWCZ6zSzo/kMSkM7ByZt5jjyp1lQQaYnZe8LmRkB3vcBb4lWlN8Gu3tvunXSlKJWp7Fh7VAgMBAAGjgYEwfzAdBgNVHQ4EFgQUSDkx6kENF55mRsJZip/xOrv2E2EwQwYDVR0jBDwwOoAUSDkx6kENF55mRsJZip/xOrv2E2GhF6QVMBMxETAPBgNVBAMMCENoYW5nZU1lggkA2Yfj2kmOI5QwDAYDVR0TBAUwAwEB/zALBgNVHQ8EBAMCAQYwDQYJKoZIhvcNAQELBQADggEBADwKrP9NcTakAbQnd+x+lBzvco0I2XOJrsm6N1r8MKVjEq9Ti5quGtoDLNQDlORnKAaWVzSg6oAFNVrItVJU5GReJ+XI+t2pXqo/OBlVoXcwG52m2rXd9e5wjdmrYwpzijvj//FjjfIZysJJiLW8xSA9t+3/BCCGqy6uBy2KNvuYMQHr2BdHU05haXtp/mrsalSTlvLFwJeUbHDrqCKoFlDjtXkzcF4sIOfF0dzQXdXT5qerZGOMsXBQ8ALFoHd/wvS5cJvI8nWywEg3w3vWCSO1zLdcNmvIqYEYrLZBhtLlwBnjKuHSsXorfJsUcmdKsgwIw1KtMBF2bBMyd8twBn8=-----END CERTIFICATE-----</ca><cert>-----BEGIN CERTIFICATE-----MIIDSTCCAjGgAwIBAgIRAODlLyd7mnQoRNC4oqxJm5AwDQYJKoZIhvcNAQELBQAwEzERMA8GA1UEAwwIQ2hhbmdlTWUwHhcNMjAwMzExMDAxMzA5WhcNMzAwMzA5MDAxMzA5WjAWMRQwEgYDVQQDDAt0ZXN0LWNsaWVudDCCASIwDQYJKoZIhvcNAQEBBQADggEPADCCAQoCggEBAOP2megEI8f/e0Xxi6n+EKQwaLZweYFTVg25vT2X6a2HHJfg8tXznih0NxGJFyITmpl+lddBXEnm/ZqSH6HBGujyd8aWHZ1algvbpyzU0qNXRoAuAjknbkcQ4/m+28/1ocGukY2aKYjQXddp4HzquSQupza/3JcJ+5roWte1PzLZCC74yfdzhdBwHHOfG4B7SfYOuT7eXQwisCrTFZmtK1FoONhwSlhqcEbMBaEjT9ZP7K7pWSmx82c7xyYhdD4JMZ79qiIm/pbeszu1SpUqd3682mVwmZZOCUWf3pRKwcwEyJnkYKS9ksKTh0F9B9VibfvNw2harR3471qwt6pbSXUCAwEAAaOBlDCBkTAJBgNVHRMEAjAAMB0GA1UdDgQWBBTv4I3fmPShB7U6scRReENGsLkiQDBDBgNVHSMEPDA6gBRIOTHqQQ0XnmZGwlmKn/E6u/YTYaEXpBUwEzERMA8GA1UEAwwIQ2hhbmdlTWWCCQDZh+PaSY4jlDATBgNVHSUEDDAKBggrBgEFBQcDAjALBgNVHQ8EBAMCB4AwDQYJKoZIhvcNAQELBQADggEBACKCvwckhCZ7w5j79gYvRhujm02z2Bah7aggZ9uoyYFw3EVi1GmyU6aoa3ui2UKciWglm8R21TuhnPsUopbWNniHDlFqOOrVxFST11FD02Qfae8P6YWhkbUoaS3IwF7NOPg56Q7VaU1P8+GI2fR5kjHrb9pBPTCFX+1gSpiA0TE3DHj4zO7NFRq+hE17QqeE1+W7pq4uyZYQFpbC6n+VsCJWBXDm/8WR97uJpjWUjFCNPm71PD5YN6cSa9iasBQVvBWbKkMaf+aFvtLHGteYrVUGkvpnw9DquYFxMnHpwegU4DQhPRL2TL8szw7751o2v2CHZ+zLJbDaq26thdoIh64=-----END CERTIFICATE-----</cert><key>-----BEGIN PRIVATE KEY-----MIIEvgIBADANBgkqhkiG9w0BAQEFAASCBKgwggSkAgEAAoIBAQDj9pnoBCPH/3tF8Yup/hCkMGi2cHmBU1YNub09l+mthxyX4PLV854odDcRiRciE5qZfpXXQVxJ5v2akh+hwRro8nfGlh2dWpYL26cs1NKjV0aALgI5J25HEOP5vtvP9aHBrpGNmimI0F3XaeB86rkkLqc2v9yXCfua6FrXtT8y2Qgu+Mn3c4XQcBxznxuAe0n2Drk+3l0MIrAq0xWZrStRaDjYcEpYanBGzAWhI0/WT+yu6VkpsfNnO8cmIXQ+CTGe/aoiJv6W3rM7tUqVKnd+vNplcJmWTglFn96USsHMBMiZ5GCkvZLCk4dBfQfVYm37zcNoWq0d+O9asLeqW0l1AgMBAAECggEBAKU7AscG6SB3b1R9BWxLeKhpZhyGXat9Sexc6muQhpF+Ux1KsPiewc40ng2Zvii26OHEvLru5wOx57N3onHN08FwrZxFBmYdWJBzvzJhd+NoyPLzZi0jBW2BMpy81/pd4cbOzzVBvkUqMjqGxW4Fe/hb0FuAqVTYqYPYUq/y8UHaatIehY3jNc46pSRmmFIDDdyh6K5lmFVZntpRKg9RzUibQxBkLZZwnRwFLf58wJbrOs9OT2QZsaSDIIK4mtL3xTVbT9ORC/ADY6XXO+Yb6IyLqD6WD5Yqh7wEpp/Gv4ObBvlObULOEZnjeAK9FIPs9gFuimBjcJK5kX3an8yok6kCgYEA/cqQIMR8ORRdTBajv2CK8RtQOJ2VPEpINcxPHK8vh38CrKNmCjETXqhkCwI1wOT/WKA4IUHBLfOhgC00cHYn6k2JfossQGh8DvjyY+JtdmSamzeecQ4i13RcnSj5G+kY/iEQogTaSALpB1UocugU116HiHSvcz+FK3Ia4lAHnjcCgYEA5fJ+lg3lCCd1Cq4UpzGWLMWpo5VBX9EuQhWRC2uIGkO4BAXVlkU/1TOvzonfoHLcyVUlLjE//p6djyVezkdVHTYYXQwrWIYEoinC4YnxV1Pcvii7WaBw9t3s5REYdgyvT0Wh7GIm+o6TMnfBTvVV/DMU6K9z59f+wLXfMZaZH7MCgYBOXhdlVub5BTXOAgusU9ZznziFUvu7M0DbA+zF8b6ee3TK9GXU7dSKXTsPPy50EwJaTpcmhdRuKRYMq2jO9V1b93dmkPkoJltwkCTg/RFKBsTK+0C8rl3J5A+ZJAbQPIlQJ8uoDBGPPP7SGdS0rr+IxZLaaxWmY83uXXy5t3ayvwKBgQCMYMrovljI7pWkTHvtSfddI9qZNAAyB5jO3S2sJBx1tEu9oPYwg9whQymb1E3CPP0OqD1HgueHgLu9bNoA4klSyPh8rXY017Qyb346hCTi5B6JtIITiEAOZZM+kH43ay0HHwJoNc+H/Mxd7gAEPQAeM+0a1CnVKuaqLR2xvzeBwwKBgC+vydOv2Fqu58b+/cWi52/stI11Y+xkdQ+/SP+cAucN05xVrfFzEbv90/Tintk2G+oCb5lWxM2uGIfSMCMACUHg03a0oZdTTapUs+i0fahuhR/ojK5i4COTHM0jF3ryr1Gjo0RUgbJe/RlnRY5vbbOS07Ao554/jPNrXGzImnQz-----END PRIVATE KEY-----</key><tls-crypt>-----BEGIN OpenVPN Static key V1-----470a961d29e78b8f4884b46741587ecf6008c6bb16acf2eae299f68df994133d7fbe5dbacd187c21ac9e61bc2aab3de0c88f39674dec40ef4844dddb80884ad4652542876fdadd98ca95cf4e9f4ed6e82b2f6315aa77c0ae9fc5dca6df68762282f629e230990b340b1b95f6f7ca18a4185176cf29c04d5d0a9f9c19083fe3b624e55a25f5e5ccf2a48f33373d56792a20f60074f9e6ef855e0b0ceca0a07300294718d41af0a97da641053397fdc944d21f5a9a702a118de21440fce772ab1711a575acc9ce0097e2fdefc1233ea2e601e49032eaf2aa3e0898c3f5b334839ff8c69c80614a45cfb0ba7d43d3476e37a22a4d43b0dbc96430b1115a6b1f6aac-----END OpenVPN Static key V1-----</tls-crypt> -
NOTE: The script automatically accounts for NAT. Notice in your client config that it sets the remote server as whatever your external address is. You may not want this behavior. If that is the case you will need to go in and edit the
remoteline with the IP address of your VPN server.
On CentOS 7
Section titled “On CentOS 7”- Make sure everything is up to date.
yum update -y && reboot. The reboot is important because if your kernel might update. If this happens you need to reboot to load the new kernel. - Run
yum install -y epel-release && yum update -y && yum install -y openvpn easy-rsa chrony && systemctl enable chronyd && chronyc makestepThis is a long series of commands, but it installs openvpn and chrony. You need chrony to ensure your time is synched. WARNING: If the time is not synched between the server and your clients, the VPN will fail to connect! - You should have copied your client config to your client already. If you haven’t, do that now. To run the VPN, run
openvpn <client_config_name>