Setup RoCE on PowerScale
View on GitHubPowerScale - Setup RoCE
- Setup RoCE on PowerScale
This tutorial walks through setting up NFS over RDMA between a Dell R7625 running Linux and a PowerScale cluster running OneFS 9.2 or later.
Verify Hardware and Software Compatibility
Section titled “Verify Hardware and Software Compatibility”PowerScale Requirements
Section titled “PowerScale Requirements”-
Must be running OneFS version 9.2 or higher
-
Must have Mellanox ConnectX-3 Pro or more recent NICs. As of writing in 2025 this should be any ConnectX NIC you buy.
-
RDMA must be supported on the front-end interfaces
-
For this tutorial I recommend a user that has the
SystemAdminprivilege. You can add this to a user withisi auth roles modify SystemAdmin --add-user <user>-
If you want to be able to add user mappings for NFS you will need the
ISI_PRIV_AUTHprivilege. You can create a role that has it and then add it to your user with the below (as your default admin user):Terminal window isi auth roles create CustomAuthRole --description "Grants ISI_PRIV_AUTH for manual ID mapping"isi auth roles modify CustomAuthRole --add-priv ISI_PRIV_AUTHisi auth roles modify CustomAuthRole --add-user <user>
-
-
You may also want to give your user access to the full command line which they can only do if they are part of the sudo group. You’ll need to login as root and then run:
-
Open the override sudoers file:
isi_visudo -f /etc/mcp/override/sudoers- Add this line for your local user:
grantcurell ALL=(ALL) NOPASSWD: ALLOr for an AD user:
DOMAIN\\grantcurell ALL=(ALL) NOPASSWD: ALLWith the user privileges out of the way, now we’ll move on to the rest.
Run this on PowerScale CLI:
isi network interfaces list -vLook for:
Flags: ... SUPPORTS_RDMA_RROCE ...Ex:
IP Addresses: 10.99.99.98 LNN: 1 Name: 25gige-2 NIC Name: mce1 Owners: groupnet0.grantsrdmasubnet.grantsrdmapool Status: Up VLAN ID: -Default IPv4 Gateway: -Default IPv6 Gateway: - MTU: 9000 Access Zone: System Flags: ACCEPT_ROUTER_ADVERT, SUPPORTS_RDMA_RRoCE Negotiated Speed: 25GbpsR7625 Client Requirements
Section titled “R7625 Client Requirements”- Operating System: CentOS 7.9 or RHEL 7/8/9 (known to work)
- NIC: Mellanox ConnectX-3 or higher, or ATTO FastFrame3
- BIOS settings: Set to performance mode
Check RDMA device availability:
sudo dnf install rdma-core libibverbs-utils ethtool pciutils nfs-utils -yibv_devinfoYou should see something like this:
[grant@aj-objsc-01 ~]$ ibv_devinfohca_id: irdma0        transport:                      InfiniBand (0)        fw_ver:                         1.72        node_guid:                      b683:51ff:fe02:7a30        sys_image_guid:                 b683:51ff:fe02:7a30        vendor_id:                      0x8086        vendor_part_id:                 5531        hw_ver:                         0x2        phys_port_cnt:                  1                port:   1                        state:                  PORT_ACTIVE (4)                        max_mtu:                4096 (5)                        active_mtu:             1024 (3)                        sm_lid:                 0                        port_lid:               1                        port_lmc:               0x00                        link_layer:             Ethernet
hca_id: irdma1        transport:                      InfiniBand (0)        fw_ver:                         1.72        node_guid:                      b683:51ff:fe02:7a31        sys_image_guid:                 b683:51ff:fe02:7a31        vendor_id:                      0x8086        vendor_part_id:                 5531        hw_ver:                         0x2        phys_port_cnt:                  1                port:   1                        state:                  PORT_ACTIVE (4)                        max_mtu:                4096 (5)                        active_mtu:             1024 (3)                        sm_lid:                 0                        port_lid:               1                        port_lmc:               0x00                        link_layer:             Ethernet
Notice, the transport is Infiniband however, the link_layer is Ethernet. Don’t be confused by this and tell the lab manager that there are no RDMA-capable Ethernet cards in the box. Not that I would do that. This happens because the original software stack was written for Infiniband and transport is hardcoded as Infiniband.
You can also confirm by running rdma link show
[grant@aj-objsc-01 ~]$ rdma link showlink irdma0/1 state ACTIVE physical_state LINK_UP netdev ens6f0link irdma1/1 state ACTIVE physical_state LINK_UP netdev ens6f1Configure the PowerScale Cluster
Section titled “Configure the PowerScale Cluster”Enable NFS over RDMA in OneFS
Section titled “Enable NFS over RDMA in OneFS”Web UI path:
Protocol > UNIX Sharing (NFS) > Global Settings > Enable NFS over RDMA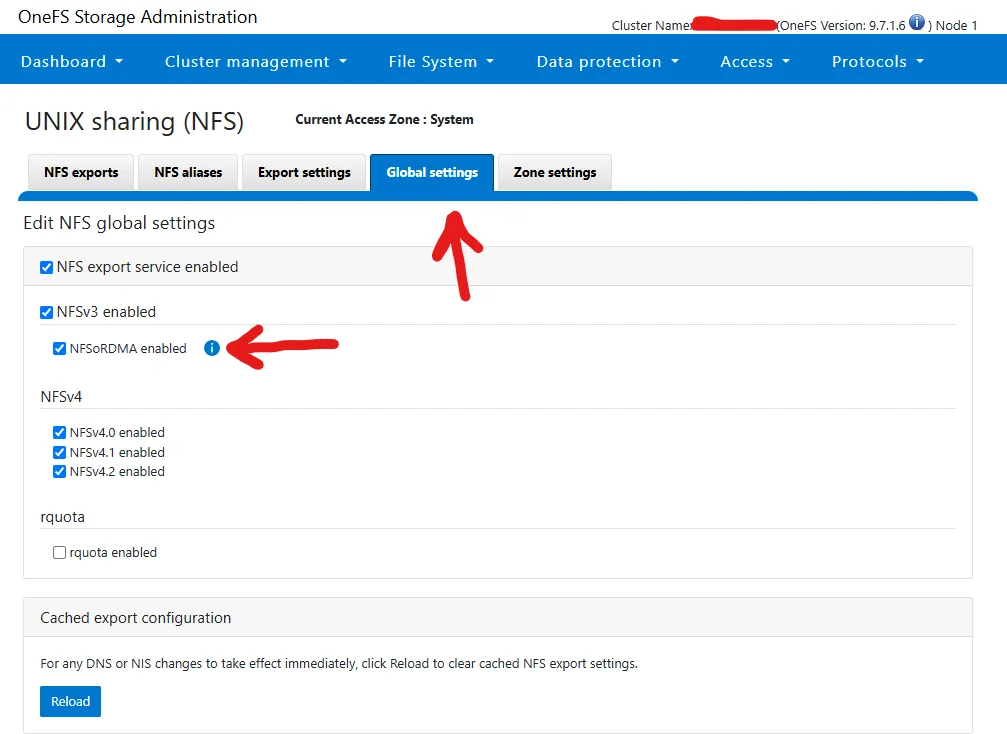
CLI equivalent:
isi nfs settings global modify --enable-rdma trueSet Access Pattern on Target Directories
Section titled “Set Access Pattern on Target Directories”TODO - do I want any of this stuff
For video files:
isi filepool policies modify <policy-name> --set-access-pattern streamingFor image sequences:
isi filepool policies modify <policy-name> --set-access-pattern streamingEnable filename-based prefetch:
isi filepool policies modify <policy-name> --enable-prefetch trueDisabling Deduplication for Performance Testing
Section titled “Disabling Deduplication for Performance Testing”In high-throughput or latency-sensitive scenarios such as benchmarking NFS over RDMA or supporting real-time media workflows, inline deduplication can add overhead that skews performance results. To ensure accurate measurement of raw storage performance, you may want to disable deduplication.
To disable inline deduplication:
isi dedupe inline settings modify --mode disabledI recommend this with workloads that are:
- Write-intensive or IOPS-bound
- Using large, unique, or pre-compressed files (e.g., video frames, genomic data)
- Focused on maximizing client-side throughput rather than storage efficiency
Configure the Network
Section titled “Configure the Network”Configure MTUs
Section titled “Configure MTUs”On all switch ports and server NICs:
MTU = 9000Linux side:
ip link set dev <iface> mtu 9000Verify:
ip link show <iface>Configure IP Addresses
Section titled “Configure IP Addresses”In this section, we create a dedicated, point-to-point RDMA network link between the Linux host and the PowerScale node using private IP addresses and a /30 subnet. In my test scenario I hooked everything together directly to avoid complicating things with the network. Usually, you will need to work with flow control, make sure your switches can handle RDMA, etc.
This configuration assumes:
- Linux interface:
ens6f1(adjust if using a different one) - Linux IP:
10.99.99.97 - PowerScale node:
node 1, port25gige-2 - PowerScale IP:
10.99.99.98 - MTU:
9000for jumbo frames - Subnet:
10.99.99.96/30 - Groupnet:
groupnet0 - Subnet name:
grantsrdmasubnet - Pool name:
grantsrdmapool
Update these values as needed for your environment.
On the Linux Side:
Section titled “On the Linux Side:”# Replace 'ens6f1' with your RDMA NIC name if differentsudo nmcli connection modify ens6f1 ipv4.addresses 10.99.99.97/30sudo nmcli connection modify ens6f1 ipv4.method manualsudo nmcli connection modify ens6f1 ipv4.gateway "" # no gateway for direct linksudo nmcli connection modify ens6f1 ipv4.dns "" # no DNS neededsudo nmcli connection modify ens6f1 802-3-ethernet.mtu 9000
# Apply changessudo nmcli connection down ens6f1 && sudo nmcli connection up ens6f1
# Verify settingsip addr show ens6f1On the PowerScale Side:
Section titled “On the PowerScale Side:”# 1. Create a dedicated subnet (change 'grantsrdmasubnet')isi network subnets create groupnet0.grantsrdmasubnet ipv4 30 --mtu 9000
# 2. Enable NFSv3 over RDMA globallyisi nfs settings global modify --nfsv3-rdma-enabled true
# 3. Create an RDMA-only pool with static IP (adjust node, interface, and IPs as needed)isi network pools create groupnet0.grantsrdmasubnet.grantsrdmapool \ --ranges 10.99.99.98-10.99.99.98 \ --ifaces 1:25gige-2 \ --nfsv3-rroce-only true \ --alloc-method static \ --description "Grant's dedicated RDMA test link"Configure the Fileshare on PowerScale
Section titled “Configure the Fileshare on PowerScale”mkdir /ifs/rdma-testchmod 755 /ifs/rdma-testisi nfs exports create /ifs/rdma-test \ --description "Export for R7625 RDMA testing" \ --clients 10.99.99.97 \ --read-write-clients 10.99.99.97 \ --root-clients 10.99.99.97 \ --all-dirs yes \ --zone SystemMount the PowerScale Export Using RDMA
Section titled “Mount the PowerScale Export Using RDMA”Make sure Correct Kernel Modules are Loaded
Section titled “Make sure Correct Kernel Modules are Loaded”sudo modprobe xprtrdmasudo modprobe rdma_ucmsudo modprobe ib_ipoibsudo mount -t nfs -o rdma,proto=rdma,vers=3 10.99.99.98:/ifs/rdma-test /mnt/powerscale_rdmaWARNING You aren’t going to be able to write anything unless the UIDs match for NFS. So whatever your UID is for your PowerScale user, that needs to match up on the Linux side. You can create a synthetic ID on Linux with:
sudo useradd -u 2010 grantcurell-mappedsudo mkdir -p /mnt/powerscale_rdma_testsudo mount -t nfs -o rdma,proto=rdma,vers=3 10.99.99.98:/ifs/rdma-test /mnt/powerscale_rdma_testsudo -u grantcurell-mapped touch /mnt/powerscale_rdma_test/helloThis will create a user with UID 2010, mount the share, and then create a file with it. You can check your PowerScale user’s ID with isi auth users view grantcurell --zone=System. Change the zone and user accordingly.
We can test if the mount is working with sudo -u grantcurell-mapped dd if=/dev/zero of=/mnt/powerscale_rdma/testfile bs=1M count=10 oflag=direct
[grant@aj-objsc-01 ~]$ sudo -u grantcurell-mapped dd if=/dev/zero of=/mnt/powerscale_rdma/testfile bs=1G count=100 oflag=direct100+0 records in100+0 records out107374182400 bytes (107 GB, 100 GiB) copied, 96.965 s, 1.1 GB/sTesting with FIO
Section titled “Testing with FIO”Install FIO:
sudo dnf install -y fio # For Rocky LinuxFirst a quick test with:
[global]ioengine=libaiodirect=1rw=readwritetime_based=1runtime=60bs=1Miodepth=32numjobs=8group_reporting=1filename_format=/mnt/powerscale_rdma_test/testfile_$jobnumsize=4G
[streaming-readwrite-0][streaming-readwrite-1][streaming-readwrite-2][streaming-readwrite-3][streaming-readwrite-4][streaming-readwrite-5][streaming-readwrite-6][streaming-readwrite-7]
Next we need to determine the NUMA node of the RDMA NIC:
cat /sys/class/net/ens6f1/device/numa_node1Tuning the PowerScale
Section titled “Tuning the PowerScale”Configuring the Multipath Driver
Section titled “Configuring the Multipath Driver”- Download the PowerScale Multipath Client Driver. Download the source code version UNLESS your kernel version perfectly matches the precompiled version Dell has. This is pretty unlikely so you’ll probably be building from source.
unzip <FILENAME> # Replace this with the filenamecd <FOLDERNAME> # Replace this with the foldername post unzipsudo dnf install -y rpm-build gcc make git kernel-devel-$(uname -r)ls -l /lib/modules/$(uname -r)/build # Make sure this returns a directory! If it's empty you have a problem with kernel source./build.sh bin- Check the directory
./dist/dellnfs-<version>_kernel_<kernel-version>.x86_64.rpmYou should have an RPM now for your kernel version. - Install with
sudo dnf install ./dist/dellnfs-*.rpm - Regenerate dracut with
sudo dracut -fand then reboot the box. - After you reboot you should see the following if you run
sudo dellnfs-ctl status
[grant@localhost ~]$ sudo dellnfs-ctl status[sudo] password for grant:version: 4.0.30kernel modules: sunrpc rpcrdmaservices: rpcbind.socket rpcbindrpc_pipefs: /var/lib/nfs/rpc_pipefsrpcrdma should alse be present:
[grant@localhost ~]$ modinfo rpcrdmafilename: /lib/modules/5.14.0-503.40.1.el9_5.x86_64/extra/dellnfs/bundle/net/sunrpc/xprtrdma/rpcrdma.koalias: rpcrdma6alias: xprtrdmaalias: svcrdmalicense: Dual BSD/GPLdescription: RPC/RDMA Transportauthor: Open Grid Computing and Network Appliance, Inc.rhelversion: 9.5srcversion: 62748E4FADA96806025465Cdepends: sunrpc,rdma_cm,ib_coreretpoline: Yname: rpcrdmavermagic: 5.14.0-503.40.1.el9_5.x86_64 SMP preempt mod_unload modversionsparm: addr_resolution_retry_seconds:uintConfigure Networking on the PowerScale
Section titled “Configure Networking on the PowerScale”In my case, I also needed to update the networking on my PowerScale to support my IP addresses in the pool:
# Modify the subnet 'grantsrdmasubnet' to expand it to a /29 prefix, allowing for 6 usable IPs# (from 10.99.99.97 to 10.99.99.102) and set the gateway to 0.0.0.0 (no gateway used).isi network subnets modify grantsrdmasubnet \  --prefixlen 29 \  --gateway 0.0.0.0
# Assign the SmartConnect Service IP as 10.99.99.102 (reserved and not part of the pool's ranges).# This is the IP clients will query for DNS resolution to access the pool.isi network subnets modify grantsrdmasubnet \  --sc-service-addrs 10.99.99.102
# Update the IP address range of the IP pool 'grantsrdmapool' to include only 10.99.99.97 to 10.99.99.101,# reserving 10.99.99.102 exclusively for SmartConnect.isi network pools modify groupnet0.grantsrdmasubnet.grantsrdmapool \  --ranges 10.99.99.97-10.99.99.101
# Add interface 2:25gige-2 (on node 2) to the grantsrdmapool to enable traffic on that physical NIC.isi network pools modify groupnet0.grantsrdmasubnet.grantsrdmapool \  --add-ifaces 2:25gige-2
Configure bond0 on R7625
Section titled “Configure bond0 on R7625”In the multipath driver setup I wanted to have multiple interfaces going out to the PowerScale so I LAG’d two server interfaces together going up to my Dell switch.
First, we need to clear out any existing network manager configs for the interfaces:
sudo nmcli con delete ens6f0sudo nmcli con delete ens6f1Then we’ll config the LAG.
# Create the bond interfacesudo nmcli con add type bond con-name bond0 ifname bond0 mode 802.3ad
# Add ens6f0 to the bondsudo nmcli con add type ethernet con-name ens6f0-slave ifname ens6f0 master bond0
# Add ens6f1 to the bondsudo nmcli con add type ethernet con-name ens6f1-slave ifname ens6f1 master bond0
# Assign IP address in your /29sudo nmcli con modify bond0 ipv4.addresses 10.99.99.103/29 ipv4.method manual
# Optional: Enable jumbo framessudo nmcli con modify bond0 802-3-ethernet.mtu 9000
# Bring up everythingsudo nmcli con up bond0sudo nmcli con up ens6f0-slavesudo nmcli con up ens6f1-slave
Configure OS10 for LAG
Section titled “Configure OS10 for LAG”I used show mac address-table to figure out which interfaces were connected on the switch to my PowerScale. Next I configured the port channel.
conf
interface ethernet 1/1/21description "Interface for Grant's PowerScale NFS test"mtu 9216switchport mode accessswitchport access vlan 1010no shutexit
interface ethernet 1/1/23description "Interface for Grant's PowerScale NFS test"mtu 9216switchport mode accessswitchport access vlan 1010no shutexit
interface port-channel 10description "Grant's R7625 bond0 uplink for NFS test"mtu 9216switchport mode accessswitchport access vlan 1010exit
interface ethernet 1/1/17description "Member of bond0 for Grant's NFS test"channel-group 10no shutexit
interface ethernet 1/1/19description "Member of bond0 for Grant's NFS test"channel group 10no shutexit
You will also need to create a LAG down to the PowerScale. If you need to find out what interfaces on the PowerScale have what MAC addresses you can run sudo isi_for_array -s "ifconfig -a | awk '/^[a-z]/ { iface=\$1 } /ether/ { print iface, \$2 }'". Keep in mind you’ll need to have sudo privileges. I tell you how to set that up in the section [PowerScale Requirements](#powerscale-requirements).
Configure DNS on R7625
Section titled “Configure DNS on R7625”For SmartConnect to work, you have to delegate DNS resolution for the nodes down to the PowerScale itself. For my lab setup I decided to run dnsmasq on my R7625 to do this.
First install dnsmasq with dnf install -y dnsmasq
Create the file /etc/dnsmasq.d/smartconnect.conf
# Authoritative local DNS zone for SmartConnect testingdomain=nfs.grantnfstest.lan
# Static DNS entry for SmartConnect Service IPhost-record=smartconnect.nfs.grantnfstest.lan,10.99.99.102
# Only respond on bond0 interfaceinterface=bond0
# Disable DNS lookups from /etc/hostsno-hosts
# Don't forward unresolved queriesdomain-neededbogus-priv
# Optional: Act as DNS server for this zone onlyauth-server
Swapping to NFSv4 (TODO)
Section titled “Swapping to NFSv4 (TODO)”This section is not finished!!!
Warning. SmartConnect Failover will not work with NFSv4. See this article
Dynamic pools provide seamless failover only for NFSv3 clients. Other connection types, including SMB/NFSv4, do not support the failover mechanism that SmartConnect dynamic pools provide. Static pools are recommended for connecting those workloads.
To run NFSv4 OneFS must be at least version 9.8!!!.
See this post: Run NFSv4 w/RDMA on Rocky v9.5
Make sure that NFSv4 is enabled:
AJ-PWRSCL1-1% isi nfs settings global view
NFS Service Enabled: Yes      NFSv3 Enabled: Yes        NFSv3 RDMA Enabled: Yes      NFSv4 Enabled: Yes              v4.0 Enabled: Yes              v4.1 Enabled: Yes              v4.2 Enabled: Yes     Rquota Enabled: No
If it isn’t you can enable it with isi nfs settings global modify --nfsv4-enabled true --nfsv41-enabled true.
Benchmarking
Section titled “Benchmarking”For more information about FIO, see my guide on using FIO.
PowerScale Info
Section titled “PowerScale Info”AJ-PWRSCL1-1% isi devices drive list --format=table
Lnn Location Device Lnum State Serial----------------------------------------------------1 Bay 0 /dev/da1 0 HEALTHY S5YRNA0TA018851 Bay 1 /dev/da2 3 HEALTHY S5YRNA0TA021071 Bay 2 /dev/da3 2 HEALTHY S5YRNA0TA017451 Bay 3 /dev/da4 1 HEALTHY S5YRNA0TA01703----------------------------------------------------Total: 4AJ-PWRSCL1-1% isi storagepool nodepools list --format=table
ID Name Nodes Node Type IDs Protection Policy Manual------------------------------------------------------------------------------1 f200_7.5tb-ssd_96gb 1 1 +2d:1n No 2 33 a300_60tb_3.2tb-ssd_96gb 4 2 +2d:1n No 5 6 7------------------------------------------------------------------------------Total: 2AJ-PWRSCL1-1% isi storagepool nodepools view f200_7.5tb-ssd_96gb ID: 1 Name: f200_7.5tb-ssd_96gb Nodes: 1, 2, 3 Node Type IDs: 1 Protection Policy: +2d:1n Manual: No L3 Enabled: No L3 Migration Status: storage Tier: - Transfer Limit: 90%Transfer Limit State: default Usage Avail Bytes: 15.79T Avail SSD Bytes: 15.79T Avail HDD Bytes: 0.00 Balanced: Yes Free Bytes: 19.42T Free SSD Bytes: 19.42T Free HDD Bytes: 0.00 Total Bytes: 20.51T Total SSD Bytes: 20.51T Total HDD Bytes: 0.00 Used Bytes: 1.08T (6%) Used SSD Bytes: 1.08T (6%) Used HDD Bytes: 0.00 (0%) Virtual Hot Spare Bytes: 3.63TRun 1 - No Tuning
Section titled “Run 1 - No Tuning”PowerScale
Section titled “PowerScale”AJ-PWRSCL1-1% isi statistics protocol list --protocols=nfsrdma --classes=read,write --sort=Ops --output=Node,Proto,Class,Ops --repeat=20Ops Node Proto Class----------------------------------------Total: 0--------------------Total: 05.5k 1 nfsrdma read1.4k 1 nfsrdma write-------------------------Total: 211.7k 1 nfsrdma read 2.9k 1 nfsrdma write--------------------------Total: 211.4k 1 nfsrdma read 2.9k 1 nfsrdma write--------------------------Total: 211.6k 1 nfsrdma read 2.9k 1 nfsrdma write--------------------------Total: 211.6k 1 nfsrdma read 2.9k 1 nfsrdma write--------------------------Total: 211.5k 1 nfsrdma read 2.9k 1 nfsrdma write--------------------------Total: 211.6k 1 nfsrdma read 2.9k 1 nfsrdma write--------------------------Total: 211.6k 1 nfsrdma read 2.9k 1 nfsrdma write--------------------------Total: 211.7k 1 nfsrdma read 2.9k 1 nfsrdma write--------------------------Total: 211.7k 1 nfsrdma read 2.9k 1 nfsrdma write--------------------------Total: 2 1.6k 1 nfsrdma read368.4 1 nfsrdma write--------------------------Total: 2[grantcurell-mapped@localhost ~]$ fio fio_rdma_test.fiostreaming-readwrite-0: (g=0): rw=rw, bs=(R) 1024KiB-1024KiB, (W) 1024KiB-1024KiB, (T) 1024KiB-1024KiB, ioengine=libaio, iodepth=32...streaming-readwrite-1: (g=0): rw=rw, bs=(R) 1024KiB-1024KiB, (W) 1024KiB-1024KiB, (T) 1024KiB-1024KiB, ioengine=libaio, iodepth=32...streaming-readwrite-2: (g=0): rw=rw, bs=(R) 1024KiB-1024KiB, (W) 1024KiB-1024KiB, (T) 1024KiB-1024KiB, ioengine=libaio, iodepth=32...streaming-readwrite-3: (g=0): rw=rw, bs=(R) 1024KiB-1024KiB, (W) 1024KiB-1024KiB, (T) 1024KiB-1024KiB, ioengine=libaio, iodepth=32...streaming-readwrite-4: (g=0): rw=rw, bs=(R) 1024KiB-1024KiB, (W) 1024KiB-1024KiB, (T) 1024KiB-1024KiB, ioengine=libaio, iodepth=32...streaming-readwrite-5: (g=0): rw=rw, bs=(R) 1024KiB-1024KiB, (W) 1024KiB-1024KiB, (T) 1024KiB-1024KiB, ioengine=libaio, iodepth=32...streaming-readwrite-6: (g=0): rw=rw, bs=(R) 1024KiB-1024KiB, (W) 1024KiB-1024KiB, (T) 1024KiB-1024KiB, ioengine=libaio, iodepth=32...streaming-readwrite-7: (g=0): rw=rw, bs=(R) 1024KiB-1024KiB, (W) 1024KiB-1024KiB, (T) 1024KiB-1024KiB, ioengine=libaio, iodepth=32...fio-3.35Starting 64 processesJobs: 64 (f=64): [M(64)][100.0%][r=1441MiB/s,w=1462MiB/s][r=1441,w=1462 IOPS][eta 00m:00s]streaming-readwrite-0: (groupid=0, jobs=64): err= 0: pid=17943: Mon Jun 2 10:01:40 2025 read: IOPS=1451, BW=1451MiB/s (1522MB/s)(86.1GiB/60723msec) slat (usec): min=64, max=404, avg=105.01, stdev=10.54 clat (msec): min=5, max=1461, avg=685.70, stdev=103.44 lat (msec): min=5, max=1461, avg=685.80, stdev=103.44 clat percentiles (msec): | 1.00th=[ 271], 5.00th=[ 550], 10.00th=[ 584], 20.00th=[ 625], | 30.00th=[ 651], 40.00th=[ 667], 50.00th=[ 693], 60.00th=[ 709], | 70.00th=[ 726], 80.00th=[ 760], 90.00th=[ 793], 95.00th=[ 818], | 99.00th=[ 894], 99.50th=[ 1020], 99.90th=[ 1267], 99.95th=[ 1318], | 99.99th=[ 1401] bw ( MiB/s): min= 886, max= 2400, per=100.00%, avg=1456.77, stdev= 3.11, samples=7659 iops : min= 886, max= 2400, avg=1456.75, stdev= 3.11, samples=7659 write: IOPS=1445, BW=1446MiB/s (1516MB/s)(85.7GiB/60723msec); 0 zone resets slat (usec): min=64, max=840, avg=118.45, stdev=11.90 clat (msec): min=11, max=1627, avg=718.20, stdev=114.60 lat (msec): min=11, max=1627, avg=718.32, stdev=114.61 clat percentiles (msec): | 1.00th=[ 288], 5.00th=[ 575], 10.00th=[ 609], 20.00th=[ 642], | 30.00th=[ 676], 40.00th=[ 693], 50.00th=[ 718], 60.00th=[ 743], | 70.00th=[ 768], 80.00th=[ 793], 90.00th=[ 835], 95.00th=[ 877], | 99.00th=[ 986], 99.50th=[ 1083], 99.90th=[ 1318], 99.95th=[ 1385], | 99.99th=[ 1536] bw ( MiB/s): min= 352, max= 3192, per=100.00%, avg=1449.56, stdev= 7.81, samples=7662 iops : min= 352, max= 3192, avg=1449.54, stdev= 7.81, samples=7662 lat (msec) : 10=0.01%, 20=0.04%, 50=0.16%, 100=0.20%, 250=0.52% lat (msec) : 500=0.92%, 750=69.11%, 1000=28.33%, 2000=0.71% cpu : usr=0.06%, sys=0.47%, ctx=176388, majf=0, minf=798 IO depths : 1=0.1%, 2=0.1%, 4=0.1%, 8=0.3%, 16=0.6%, 32=98.9%, >=64=0.0% submit : 0=0.0%, 4=100.0%, 8=0.0%, 16=0.0%, 32=0.0%, 64=0.0%, >=64=0.0% complete : 0=0.0%, 4=100.0%, 8=0.0%, 16=0.0%, 32=0.1%, 64=0.0%, >=64=0.0% issued rwts: total=88135,87786,0,0 short=0,0,0,0 dropped=0,0,0,0 latency : target=0, window=0, percentile=100.00%, depth=32
Run status group 0 (all jobs): READ: bw=1451MiB/s (1522MB/s), 1451MiB/s-1451MiB/s (1522MB/s-1522MB/s), io=86.1GiB (92.4GB), run=60723-60723msec WRITE: bw=1446MiB/s (1516MB/s), 1446MiB/s-1446MiB/s (1516MB/s-1516MB/s), io=85.7GiB (92.1GB), run=60723-60723msecFirst Thoughts
Section titled “First Thoughts”I’m running on a 25Gb/s link so we should be able to get a max theoretical speed of 3.125GB/s unidirectional. Now with multipathing, we should get three streams because I have three nodes so we should see a max theoretical of 9.375GB/s. I haven’t configured multipathing yet though.